Fast and easy hacking, that's what the official Armitage website is named as. And fast and easy hacking it is. It is not recommended starting your life as a penetration tester with Armitage. But after you know the basics of metasploit (which you do now), you can take a look at this great tool. And I've started to assume you have
Kali Linux installed.
Installing Metasploit
Now metasploit is not distributed with Kali Linux (it was distributed with backtrack though). However, Kali has it on its repositories, and it can be easily downloaded and installed by executing-
apt-get install armitage
It will check dependencies and download the required file and install Armitage for you. After its done, you can start armitage by using the following code-
service postgresql start
service metasploit start
armitage
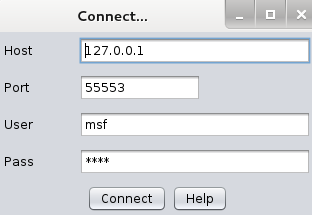
You will get a screen like this. Let the settings be as they are, and click connect. You'll get a prompt like this (most of the time)
Now you'll see Armitage making some connection for you. For a short while it might show failure messages (Connection Refused), but after some time Armitage will start.
And you'll end up with a windows somewhat like this
Now while I do believe that the developer has succeeded in making a tool which permits me to say - "I'll take my leave, you can handle stuff from here", but I'd still go on for a while, helping you know some basic stuff before I take my leave.
Armitage Basics
Now the tough coding (honestly there wasn't anything tough about that) that you had to do with Metasploit, becomes as easy as a click on Armitage. Better yet, you can see exactly what line of code is actually executed when you do something with your mouse. As a start, you should do a quick scan with OS detect.
And while it does ask you to enter some stuff now, it is going to be pretty easy, you just have to follow the example given by armitage with some modification.
First do your old ifconfig on a new terminal to find you IP
ifconfig
Notice that most of the time, the first 6 digits are 192.168. You have to figure out the next 3 digits. After that, you can enter the ip into the armitage window. Look at the sample it had provided, just copy that, and, replacing the 1 with 154 as in my case. You final code should be 192.168.154.0/24. The 0/24 means it'll look at all the IPs from
192.168.154.1 to 192.168.154.256. Actually it scans IP from 192.168.xxx.0 through 192.168.xxx.255. Most of the time, you'll find your host in this range, however, to include all IP from 192.168.0.0 to 192.168.255.255, you may use 192.168.0.0/16.
This is the automatically generated code after clicking OK.
Now, after a few seconds, you will see the following message, and it tells you exactly what you're supposed to do next.
Now a couple of computers with respective OS icons will show up on your screen. As expected, you'll have to go to Attacks -> Find attacks. There's no rocket science here, and I'm not putting any more screenshots. After that, right click on the computer you want to hack, and you'll see an attack option. Select whichever you want to try, enter the requisites (you learnt how to do Information gathering in the previous
Metasploit tutorials). Everything will be quite easy, except for the fact that the exploits in attack section will be possible exploits, that might or might not work. If you're expecting a click to hack you a Windows 7 machine, then that's just not happening. It might work with an unpatched XP machine, a ms03_026_dcom might do the trick, or the netapi one. Good luck with playing around with this tool. And here's the
official Armitage website (media section link, useful vids and pics there) where you might find some more guidance, though the tool doesn't need any.


0 comments:
Post a Comment