RN-QQHFzQYtPGkUCfyu8eve2qf0

Friday 28 February 2014

Penetration Testing : Hacking Windows Using Metaploit and Meterpreter

0 comments

Pentesting with Windows Using Metasploit

Now, in the previous tutorial, which was the first tutorial on practical penetration testing, we got our hacking lab setup and exploited our first victim machine, which was an unpatched and vulnerable Windows XP machine. Our attacker machine was Kali Linux, and we were using Metasploit Framework, the most best tool when it comes to penetration testing (pentesting). We used the MS08-dcom vulnerability, which is a very famous vulnerability in Windows XP. The fact that it is famous means that most of the Windows machines already have this vulnerability patched, which means it will not actually work on a real life system (unless its your grandpa's system, which does not have automatic updates enabled). Now in this tutorial we will move on to payload execution, and see what all we can do after we have successfully exploited a vulnerability. It's important that you go through the previous tutorial in order to understand this one, as I will not explain the steps on how to exploit a system. 


I will only show you what to do after you have successfully exploited one. Here is the link-

Exploiting A Vulnerable Windows Machine Using Metasploit

The above link will also help you setup a penetration testing lab with an attacker machine (Kali linux), a victim machine (XP unpatched). Both will be virtual machines and will be created using VMware workstation.  Now assuming you have read the above tutorial and have successfully exploited an XP machine, you are ready to move from the tedious jobs to the fun ones.

For those who come from previous tutorial

You are most probably left with something like
C:\WINDOWS\system32>
Now this is exactly what you'll get if you start a command prompt shell in your XP. A command prompt shell is like the terminal in linux. From here you  can do stuff in non GUI mode. The command prompt can be started on a Windows machine ( will work on any version most probably). Type <Windows> + R. The windows key can be found between ctrl and alt, and looks like the windows logo. This will open the Run window.( If the key combination doesn't seem to work, figure out some other way to get the run windows. Alternatively you can open the task manager and click new task.) Now type cmd and press enter. You will see a black windows with title command prompt. This is exactly what you obtained in your Kali machine after you successfully completed previous tutorial. Now what you can do is move around, create and delete stuff etc. For example 'cd..' (no quotes) takes you one directly above where you already where. cd <name> takes you to the name folder in command prompt (if it exists). Now I can't really start teaching command prompt here, and it will be better if you google it up or go to this site about command prompt codes. After you have played enough, type exit and you'll leave the command prompt. You can now move on to a better payload than the shell_bind_tcp that we were using. We will use the meterpreter payload.

Steps you don't repeat

  • Information gathering - You don't have to determine the IP addresses of target and victim computer again. They are the same.
  • You don't have to specify the exploit again, however you can use a new exploit if you want to. I recommend that you use a new exploit as you have to take every opportunity to practice more and more stuff, specially when you just got started. We used exploit/windows/dcerpc/ms03_026_dcom. This time we will use netapi , i.e. exploit/windows/smb/ms08_067_netapi

Things that changed

  • The PAYLOAD - We are using meterpreter payload instead of shell_bind_tcp. We will end up with something like meterpreter> instead of C:\WINDOWS\system32>. Once successful, meterpreter provides a lot of functionality.
  • The payload requirements. All payloads require you to specify the port and IP of target (RHOST). However, some payloads require the IP of attacker machine too (LHOST). Use SHOW OPTIONS to figure out what all data your exploit needs. In the information gathering step you already obtained the IP and open ports of victim as well as your own IP. Use the SET command to assign whatever values you need to assign. All other SET commands will be same, other than 
SET LHOST 192.168.---.---
The screenshots below will help you through the process. I will make it even more detailed when I am able to get time.

Exploiting the machine

Here are a few screenshots to guide you through the process of exploiting the machine. I am not explaining anything, as you already know the details from the previous tutorial. The point I want you to notice is that I'm using a different payload and a different exploit this time. The payload is meterpreter (the best payload offered by metasploit, with a load of functionality) and the exploit is Netapi (works on the same MS08 vulnerability, just a different exploit). The exploit has been changed just for the sake of practice, and you are suggested to try out even more exploits (most of the times you'll fail, but keep trying). Here are the screens-
Victim's IP (Windows XP)
Attacker's IP (Kali Linux)


Starting the postgresql and metasploit services
Starting the metasploit framework


Selecting the exploit
Setting RHOST and PAYLOAD
Exploiting the XP target
So we finally have exploited the machine. Now the fun part begins

Post-exploitation fun : Using the payload features

To see a list of options provided by meterpreter, just type ?
meterpreter > ?

Getting to know the victim

Now lets do a basic sysinfo to see some info about the system we have just gained access to. Also, do a getuid to get information about the user that you are logged in as in the victim system, and the privilege the user (or you) have. And getpid will show you the process your payload is using, and ps lists all the processes running on the victim system.
meterpreter > sysinfo
meterpreter > getpid
meterpreter > getuid
meterpreter > ps
 Note: Making these code boxes is getting tedious some I'm gonna keep the code in bold. You guys help yourselves. (I'm lazy as hell)

A few random meterpreter run commands

You might also do a run checkvm to check if your target is running on a virtual machine. 
To get a list of all applications installed on your victim machine, type run get_application_list.
To stop the antivirus on the victim, do a run killav. It will not work in practical cases, as killing an antivirus process can't possibly as easy as a single line of code. However, depending on your victim machine which you have chosen in this practice session, there are chances that it might work.

Conclusion

You just gotta try more commands. Most are fun.
That's it I guess. I'd leave you here. Explore other commands that you can execute, and comment if you find anything interesting. I'd keep adding stuff to this list whenever I get time.

Friday 21 February 2014

WINDOWS 8 PRODUCT KEYS

0 comments
      WINDOWS 8 PRODUCT KEYS   

 Windows 8 Professional Edition Key :XKY4K-2NRWR-8F6P2-448RF-CRYQH
Windows 8 Release Preview Key:TK8TP-9JN6P-7X7WW-RFFTV-B7QPF
Windows 8 Consumer Preview Key:DNJXJ-7XBW8-2378T-X22TX-BKG7J 
Windows 8 Developers Preview Product key:6RH4V-HNTWC-JQKG8-RFR3R-36498
Windows Server 8 Developers Version Key:4Y8N3-H7MMW-C76VJ-YD3XV-  MBDKV
6RH4V-HNTWC-JQKG8-RFR3R-36498
4Y8N3-H7MMW-C76VJ-YD3XV-MBDKV
MBFBV-W3DP2-2MVKN-PJCQD-KKTF7
28VNV-HF42G-K2WM9-JXRJQ-2WBQW
NF32V-Q9P3W-7DR7Y-JGWRW-JFCK8
English: DNJXJ-7XBW8-2378T-X22TX-BKG7J
Chienese: DNJXJ-7XBW8-2378T-X22TX-BKG7J
French: DNJXJ-7XBW8-2378T-X22TX-BKG7J
German: DNJXJ-7XBW8-2378T-X22TX-BKG7J
Japanese: DNJXJ-7XBW8-2378T-X22TX-BKG7J


 VMNVQ-VH6XM-GCYW7-4X8VM-8FDG3 
M2XN7-4PT2W-H8GJF-X7D9Y-MY2KQ 
Q9QX3-BNJ4R-WVGMC-RJK89-XKT63 
8N4QH-2WT9H-T7GRF-3JBKY-DPBQD 
PW39T-8NHVC-JGCJD-CYB6F-F6V3D 

Windows 8 Pro:-

DWV49-3GN3Q-4XMT7-QR9FQ-KKT67 
N4WY8-DVW92-GM8WF-CG872-HH3G7 
J6FW2-HQNPJ-HBB6H-K9VTY-2PKT7 
MMRNH-BMB4F-87JR9-D72RY-MY2KV 
76NDP-PD4JT-6Q4JV-HCDKT-P7F9V 

YY8FN-22WHK-MVQKP-PDX29-P34DH 

X7B3J-GNVTB-QB8D2-JKC48-BWMQH 
FNV82-RR446-JC3R9-6C4WC-D6667 
VY9Q4-6HN66-2XKKK-JP72K-MG667 
J2HNC-BGC8H-4CY69-K3784-84YQH 
RB29C-D6NRY-BYVG3-HQ6TP-7CBQH 
W6V3Y-NCMH2-4X3Y8-2DTBB-X4PKV 
WHK3K-N482H-BTY8Q-MKFJ9-3RPKV 
N9DCG-TBM98-R2GGF-6B6GF-QGJXV 
DX6QP-7N6J4-7T247-TYCW6-RRDG7 

T2NRP-MWCYQ-TJHD6-KF69K-T8XT7 

NC2CV-P7Q6H-QM9CJ-DXRCV-X73G7 
7F3P2-NV6JH-BPWP7-RVHFF-9WXT7 
G8BND-4G737-GQM3W-FWH82-2DG67 
T8CHN-XJQFC-72PCQ-KDR2Q-XHF9V 
PKNXG-QK8QG-CHKFD-4PPMX-JW8XV 
RN84G-HFRTT-M3D7G-JVWHV-X73G7 
MQN4Y-CCKBW-WDH4V-RQ84W-XWXT7 
W93NP-RQJTC-BVKKY-VDBQK-V2WXV 
YGMNF-FJG92-8J2V6-TBT8P-BR9T7 
4MKTX-N2GM8-QQR26-V74GM-B4DG7 
FJFNG-QWTD6-C9XG7-RQXKG-PDG67 
MP64N-7KHDM-JJBTW-4TRKR-W8CKV 
T63QP-JN24K-VCY8P-B7FHV-FJMQH 
T6HNG-PFKX9-FQVTG-WB99H-VT667 

 967N4-R7KXM-CJKJB-BHGCW-CPKT7 

RRYGR-8JNBY-V2RJ9-TJP4P-749T7 
ND8P2-BD2PB-DD8HM-2926R-CRYQH 
F8X33-CNV3F-RH7MY-C73YT-XP73H 
BDDNV-BQ27P-9P9JJ-BQJ96-KTJXV 
KNTGM-BGJCJ-BPH3X-XX8V4-K4PKV 
CDQND-9X68R-RRFYH-8G28W-82KT7 
7HBX7-N6WK2-PF9HY-QVD2M-JK49V 
4NMMK-QJH7K-F38H2-FQJ24-2J8XV 
HNRGD-JP8FC-6F6CY-2XHYY-RCWXV 
KQWNF-XPMXP-HDK3M-GBV69-Y7RDH 
F2M4V-KFNB7-9VVTW-MVRBQ-BG667 
VHNT7-CPRFX-7FRVJ-T8GVM-8FDG7 
GPTCC-XN297-PVGY7-J8FQY-JK49V 
HV3TW-MMNBG-X99YX-XV8TJ-2GV3H 
2GVN8-TV3C2-K3YM7-MMRVM-BBFDH 
84NRV-6CJR6-DBDXH-FYTBF-4X49V 
CR8NP-K37C3-MPD6Q-MBDDY-8FDG7 
39DQ2-N4FYQ-GCY6F-JX8QR-TVF9V 
Q4NBQ-3DRJD-777XK-MJHDC-749T7 
D32KW-GNPBK-CV3TW-6TB2W-K2BQH 
NBWPK-K86W9-27TX3-BQ7RB-KD4DH 
2NF99-CQRYR-G6PQ9-WYGJ7-8HRDH 
F7BDM-KTNRW-7CYQP-V98KC-W2KT7 
4JKWV-MNJCY-8MW3Q-VJYGP-DC73H 
FFX8D-N3WMV-GM6RF-9YRCJ-82KT7 
2CMGK-NMW4P-B846H-YXR6P-27F9V 
D2GBF-NGBW4-QQRGG-W38YB-BBFDH 
NTVHT-YF2M4-J9FJG-BJD66-YG667 
GBJJV-YNF4T-R6222-KDBXF-CRYQH 
3NHJ7-3WWQK-4RFTH-8FHJY-PRYQH 
988NM-XKXT9-7YFWH-H2Q3Q-C34DH 
TGXN4-BPPYC-TJYMH-3WXFK-4JMQH 
N9C46-MKKKR-2TTT8-FJCJP-4RDG7 
2VTNH-323J4-BWP98-TX9JR-FCWXV 
D7KN2-CBVPG-BC7YC-9JDVJ-YPWXV 

3MHNP-V3YQ3-6XJYK-9P93C-749T3 Core 

48H7B-NXQ2P-YKBY6-BP74B-QJXT3 Core 
7RN69-T7DTK-WD2GF-R3MJQ-RJMQD Core 
8N4QH-2WT9H-T7GRF-3JBKY-DPBQD Core 
BQHHR-NW8GW-4MBJ8-YVJK6-KTJXQ Core 
CNFQR-GK8CG-KC4BH-J2MWT-GMQG3 Core 
CYNH7-6J6VG-28CT6-4YGY3-488XQ Core 
FN426-MCYJY-28X86-3XPD8-K2BQD Core 
FWNFB-C28XG-FHKMF-WPC6J-K2BQD Core 
HYTMK-MN4HC-H3T2G-CBGQR-X2BQD Core 
M2XN7-4PT2W-H8GJF-X7D9Y-MY2KQ Core 
NYTKV-4QX68-KH34F-XTQ7H-3JXT3 Core 
PW39T-8NHVC-JGCJD-CYB6F-F6V3D Core 
Q9QX3-BNJ4R-WVGMC-RJK89-XKT63 Core 
RM96G-CWNFV-7RX24-D4THG-Y949Q Core 
VMNVQ-VH6XM-GCYW7-4X8VM-8FDG3 Core 
VR9W4-3NMR2-63GV3-P3J2D-973G3 Core 

2GVN8-TV3C2-K3YM7-MMRVM-BBFDH Professional 

4NMMK-QJH7K-F38H2-FQJ24-2J8XV Professional 
76NDP-PD4JT-6Q4JV-HCDKT-P7F9V Professional 
7HBX7-N6WK2-PF9HY-QVD2M-JK49V Professional 
84NRV-6CJR6-DBDXH-FYTBF-4X49V Professional 
967N4-R7KXM-CJKJB-BHGCW-CPKT7 Professional 
BDDNV-BQ27P-9P9JJ-BQJ96-KTJXV Professional 
CDQND-9X68R-RRFYH-8G28W-82KT7 Professional 
DWV49-3GN3Q-4XMT7-QR9FQ-KKT67 Professional 
F2M4V-KFNB7-9VVTW-MVRBQ-BG667 Professional 
F8X33-CNV3F-RH7MY-C73YT-XP73H Professional 
GPTCC-XN297-PVGY7-J8FQY-JK49V Professional 
HV3TW-MMNBG-X99YX-XV8TJ-2GV3H Professional 
J6FW2-HQNPJ-HBB6H-K9VTY-2PKT7 Professional 
KQWNF-XPMXP-HDK3M-GBV69-Y7RDH Professional 
MMRNH-BMB4F-87JR9-D72RY-MY2KV Professional 
N4WY8-DVW92-GM8WF-CG872-HH3G7 Professional 
ND8P2-BD2PB-DD8HM-2926R-CRYQH Professional 
RRYGR-8JNBY-V2RJ9-TJP4P-749T7 Professional 
VHNT7-CPRFX-7FRVJ-T8GVM-8FDG7 Professional 


Enterprise :-
N7RRX-RVH4P-PCPBM-89D8Y-X4PK2 

BYXV8-9YN72-VTF7H-8G7PT-WW8X2

video part:- 
http://www.youtube.com/watch?feature=player_detailpage&v=KmYZ-b9xXMc

Friday 14 February 2014

Penetration Testing - Hacking XP

0 comments
Our approach to penetration testing is going to be simple. I already made a post about the ideal way to begin penetration testing. But we aren't going to ideal way. I'm gonna teach you penetration testing the way I learnt it. By doing actual penetration and exploitation. We can't hack completely patched Windows 7 or Windows 8 right in the first tutorial, but we can definitely hack an unpatched Windows XP machine. However, to do that, you need to victim machine. Testing this method on someone else's computer is not recommended and is quite illegal. It is strongly advised to create your own virtual machine and test exploits there.

What are you going to need

Knowledge

  • Basic Penetration testing terms (I recommend that you take a look here, as I'm going to use the terms freely without any explanation here in this tutorial)
  • The tough manual way of penetration testing (A large patch of advanced material which will help you become a great pentester if you have the patience to read it all and capability to understand it)
  • VMWare tools (Without Vmware tools there is no way you can have a Kali linux (attacker machine) and unpatched XP (target machine) running at the same time in one single computer)

Virtual Machines

  • Kali linux ( Click the link for a complete detailed guide)
  • Windows XP (After you've followed the tutorial above for installing Kali linux, installing XP on a VM will be a piece of cake, a few screenshots of the process)


Now there is catch in Windows XP. While Kali linux is free, Windows XP is not. So you have to buy one. I'm dead against piracy, and won't promote anything of that kind on my blog. Just make sure that when you are buying a Windows XP cd, it is unpatched and SP1. If it is patched then the exploits won't work. Your best bet would be to look up your shelves to find an old XP cd that you bought years ago which is catching dust, and put it to some use.

A look at Metasploit Framework

Starting the framework

"In keeping with the Kali Linux Network Services Policy, there are no network services, including database services, running on boot so there are a couple of steps that need to be taken in order to get Metasploit up and running with database support." Simply speaking, there are some services that metasploit needs which aren't started with system startup. So here's some commands you need to execute on your console before you can start metasploit
service postgresql start
(Metasploit uses PostgreSQL as its database so it needs to be launched first.)

With PostgreSQL up and running, we next need to launch the metasploit service. The first time the service is launched, it will create a msf3 database user and a database called msf3. The service will also launch the Metasploit RPC and Web servers it requires.
service metasploit start
Now finally we are ready to start metasploit framework.
msfconsole

Looking at the targets

Right now, my metasploit framework is running on Kali on Vmware on a Windows 8 machine. Also, there is a Windows XP Sp3 virtual machine running side my side with my Kali. So what we need to do is detect these machines in Metasploit framework. For this we'll do a port scan.

Port Scan

Metasploit offers an awesome port scanning function which goes by the name auxiliary scanner. Here is the command to execute this scan
To use this feature, enter the following code-
use auxiliary/scanner/portscan/tcp
Type show options to see the available options
show options
 Now we have to change a few settings, firstly, we should reduce the number of ports scanned
 set ports 1-500
Secondly, we have to specify a target IP to scan. Now this is a bit tricky, as the IP is not going to be the same in all cases. So here's what you'll do. Go to your XP virtual machine (the one you are trying to hack). Open command prompt and type
ipconfig
In the results, check the IP of the machine. This is what you'll have to specify the RHOSTS option as.
In my case the IP is 192.168.63.131
Now go back to your Kali machine, and type the fol (change the IP as required)
set RHOST 192.168.63.131
Here's what it should look like


There's a slight error here, I spelled RHOSTS wrong. Make sure you add the 's' in the end.
Now we are ready for some action, do a show options again to see what all changes you've made. Finally, type-
run
The scan will start and after some time it will show you which tcp ports are open and vulnerable to attack.
If you had not been using an unpatched version of Windows, there will not be any vulnerable ports.
This basically means that there are no open ports here. Nothing much you can do. However if you had some good luck there, and had a vulnerable machine, you will have some vulnerable ports. In my case, I turned off the firewall on the windows machine and run the auxiliary module again.
I got 3 open ports this time. If you are using some higher XP version, you too might need to disable firewall in order to get open ports.
Now we know we have a target at IP 192.168.63.131 and it has port 135 139 and 445 open.


Real life port scan

In actual pentesting environment, you don't know about the IP, open ports and OS of the target computer. In such cases, we can use Nmap port scanner which is much better than auxiliary. We'll come to that later.

Finding Exploits

This step is important. We need to figure out which exploits work on the OS we are attacking. In our case, we already know what to do. Type back to get out of auxiliary scanner. Search for dcom on msfconsole.
search dcom
This is a very famous exploit for Windows.
Copy the exploit number 3. (Which shows great as rank). In the next line, type
use exploit/windows/dcerpc/ms03_026_dcom
You are now using the most famous Windows exploit. Type show options again
show options
Again, set the RHOST as 192.168.63.131 (replace with the IP of your target)
set RHOST 192.168.63.131 
Also, set a payload.
set PAYLOAD windows/shell_bind_tcp

And here's the best part
exploit

You have now successfully broken into the target computer. You have an open shell on the target computer with administrator privileges. In short, you own that computer now. Try out what all you can do from here on. I'll come up with more in the next tutorial.
Update - The next tutorial is here. It discusses the post exploitation fun that you can have with the meterpreter payload.  Post exploitation fun in an exploited xp machine
We have a pentesting lab now and have successfully exploited an XP machine.

Thursday 13 February 2014

Complete Detailed Guide on Installing Kali linux in Vmware

0 comments
This tutorial will walk you through the difficult process of installing Kali Linux in VMware Player, a free virtual machine manager that can be downloaded from www.vmware.com. This tutorial assumes that you have some basic knowledge of your computer (amount of RAM number of processors, etc.) This tutorial is also intended for beginners who haven’t worked with VMware or Kali Linux before.


Step One:

First we need to download Kali from http://kali.org/downloads/. If you have a 64-bit capable computer (like me), then you probably will want the 64-bit version of Kali for performance reasons. Expand the drop down menu’s to find the version you need. Select the 64-bit version ONLY if you have a 64-bit computer.

step 1
Step Two:
If you don’t have a torrent program, then click the link highlighted above and select “Save” when the download notification appears. Make sure you know where you saved it.
step 2
If you have a torrent program, then I highly recommend using the torrent option. Click on theTorrent link, it will open the torrent file in your browser. Just copy the URL of it and enter it in your torrent program.

step 2.1
step 2.2
Now wait for Kali to download, this might take several hours, depending on your internet speed.
Step Three:
When Kali has finished downloading, open VMware Player and click Create a new virtual machine.

step 3
Step Four: 
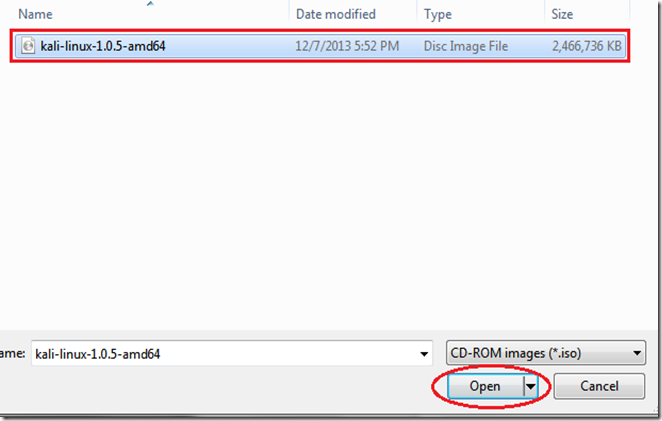
In the window that opens, select Installer disc image file (iso) and browse to the location of and select the Kali Linux ISO file that you just downloaded.

step 4
step 4.1
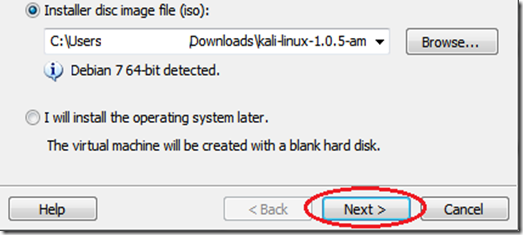
Once you have selected the file, click Next.
step 4.2
Step Five:
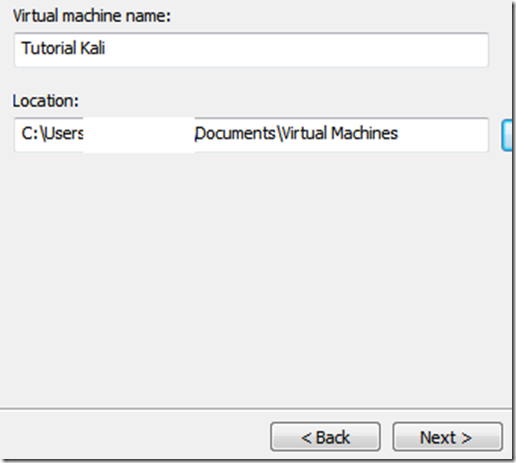
In the next step, select a name for the virtual machine. I’m going to name it Tutorial Kali for this tutorial. You also need to select a location for it, I recommend creating a folder called “Virtual machines” in My Documents. Then click Next.
step 5
Step Six:
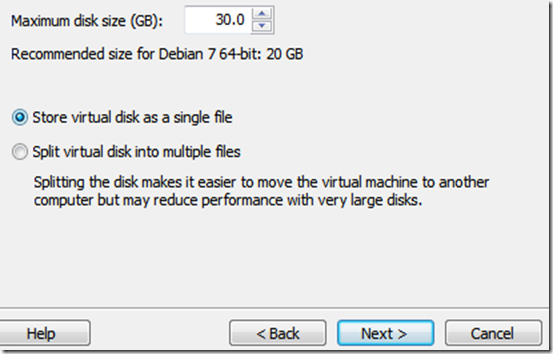
Next step, you need to select a maximum size for Kali. I recommend doing at least 30 GB’s as Kali tends to expand over time. After you’ve entered your desired value (no less than 20 GB) change the next option to Store virtual disk as a single file and click Next
step 6
Step Seven:
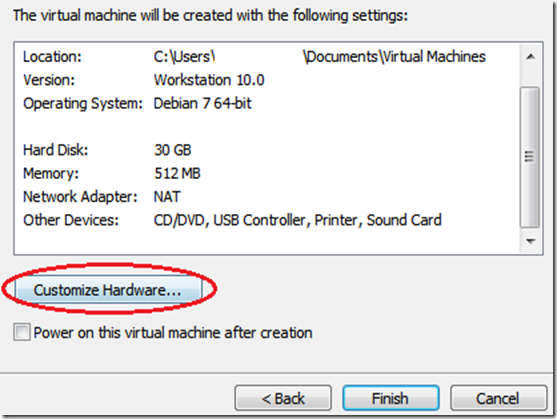
In the next window, we need to customize some hardware settings, so click on the Customize Hardware… button.
step 7
Step Eight:
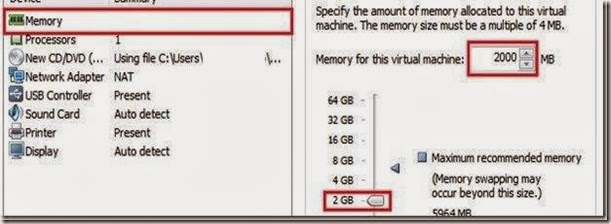
You will now be presented with a Hardware window. In the left pane select Memory in the left pane of the window, and slide the slider on the right side to at least 512 MB*. This is for performance. Since I have 8 GB of RAM on my computer, I’m going to put it at 2 GB’s (2000 Mb’s).*Note, you should give a virtual machine a maximum of half the RAM installed on your computer. If your computer has 4 GB of RAM, then the max you want to slide it to is 2 GB. If your computer has 8 GB, then you can go to a max of 4 GB etc.. 
step 8

Now highlight Processors in the left pane. This option really depends on your computer, if you have multiple processors, then you can select two or more. If you have a regular computer, with two or less, then I suggest leaving this number at one.
step 8.1

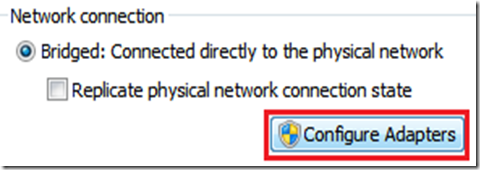
Moving on, click on Network Adapter in the left pane. On the right side, move the dot to theBridged (top) option. Now click on the Configure Adapters button.
8.2
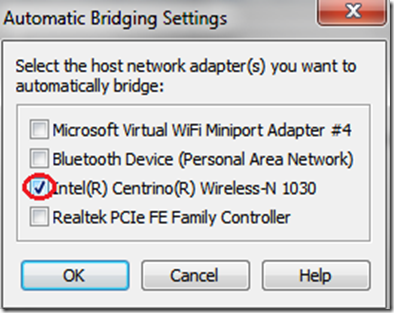
In the small window that pops up, uncheck all the boxes except for the one next to your regular network adapter and hit OK.
8.4
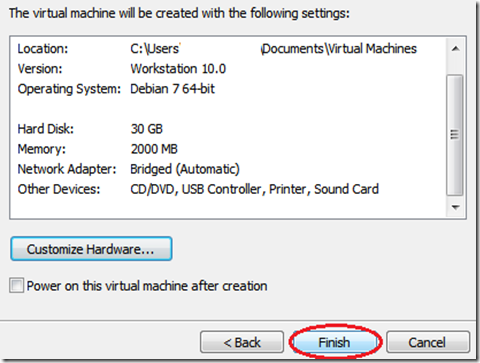
You can now click on Close at the bottom of the Hardware window and then click on Finishin the Wizard.
step 8.5

Step Nine
After you click Finish the window will close and the new virtual machine file will be added to the VM library. Now all we have to do is start Kali and install it! To do this, highlight the name of the newly created virtual machine by clicking on it, and click Play virtual machine in the right pane.
step 9
This will start Kali for the first time.
Step 10:
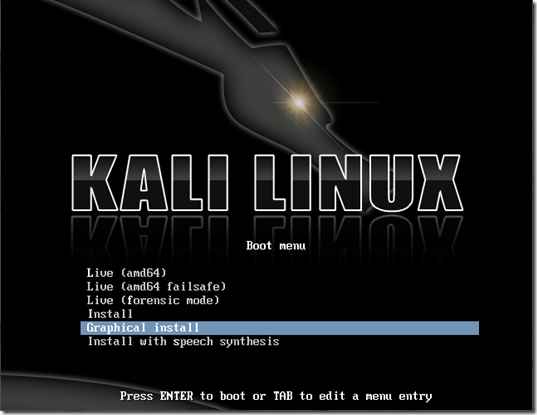
At the boot menu, use the arrow keys to scroll down to Graphical install and hit enter.
step 10
Step 11:
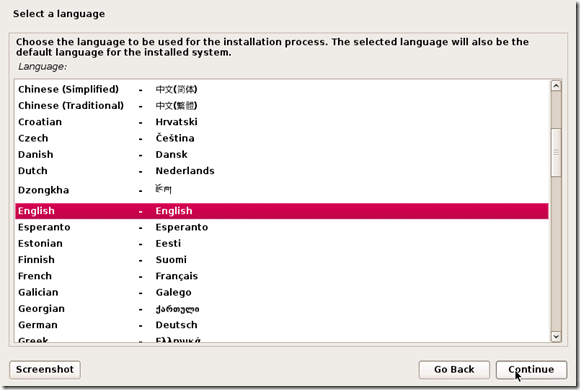
The next screen will ask you to select your preferred language, you can use the mouse to select this, then click Continue.
step 11
Step 12
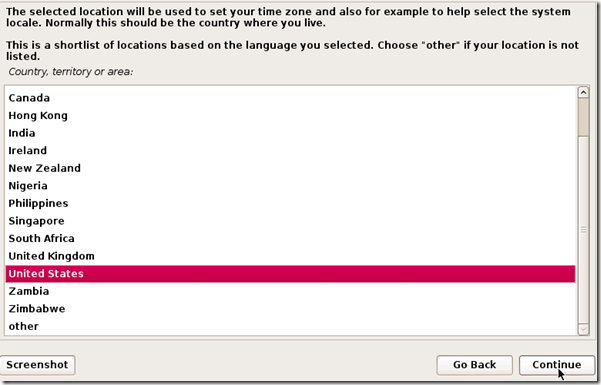
On the next screen, select your location and hit Continue.
step 12
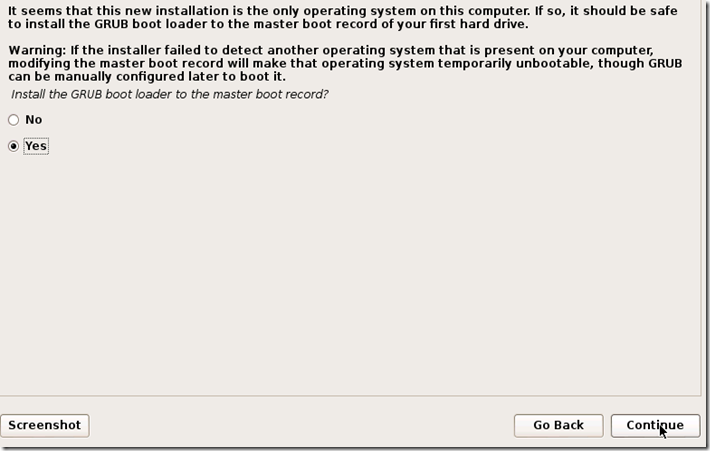
It’ll now ask you for your standard keymap. If you use the standard American English keyboard, then just click Continue.
step 13
Step 14:
Wait until Kali finishes detecting the hardware on your computer. During this, you might be presented with this screen:
step 14
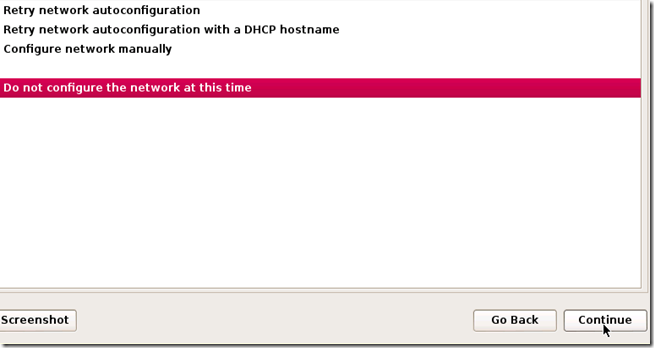
Just hit Continue and select Do not configure the network at this time on the next screen.
step 14.5
Step 15:
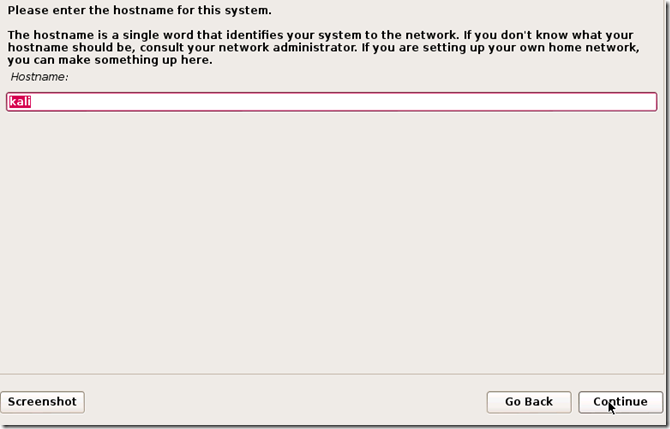
You will now be asked to supply a hostname, which is kind of like a computer name. You can enter anything you want, or you can just leave it as kali. When you’re done, hit Continue.
step 15
Step 16:
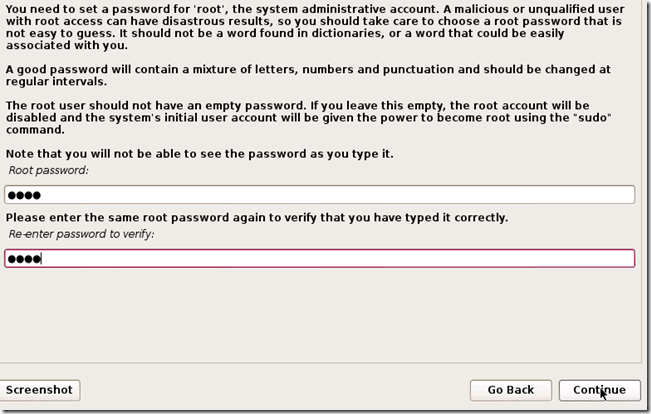
Kali will now ask you to enter a password for the root (main) account. Make sure you can easily remember this password, if you forget it, you’ll have to reinstall Kali. Hit Continue after you’ve enter and re-entered the password of your choice.
step 16
Step 17:
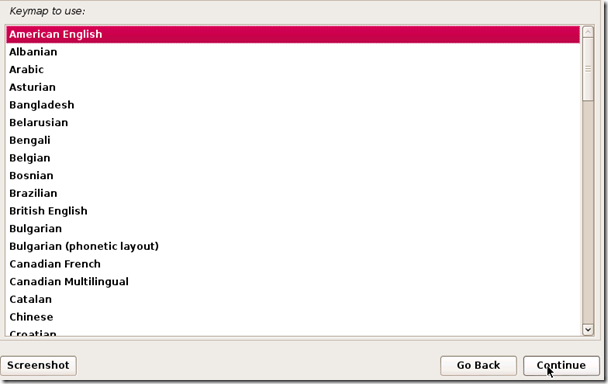
The next step will ask you for your time zone, select it and click Continue.
step 17
Step 18:
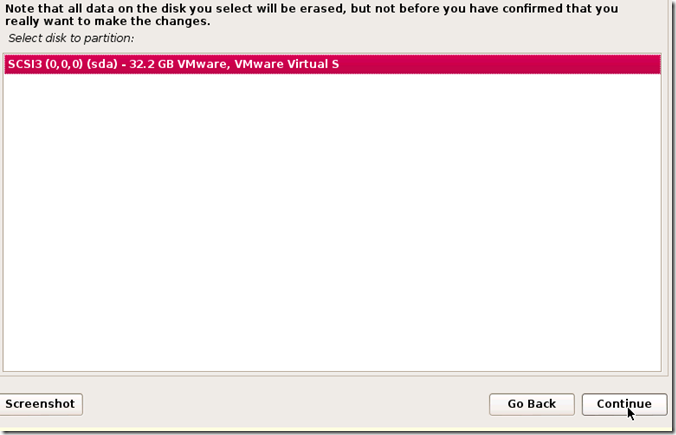
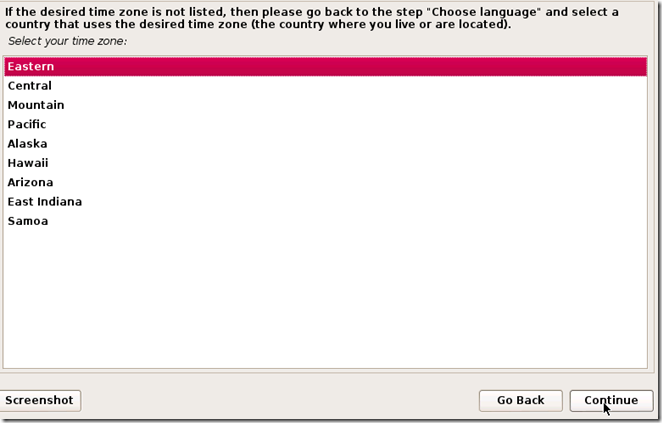
Wait until Kali detects the disk partitions. When you are presented with the next step, selectGuided – use entire disk. (this is usually the top option) then click Continue.
step 18
The installer will now confirm that you want to use this partition. Hit Continue.
step 18.5
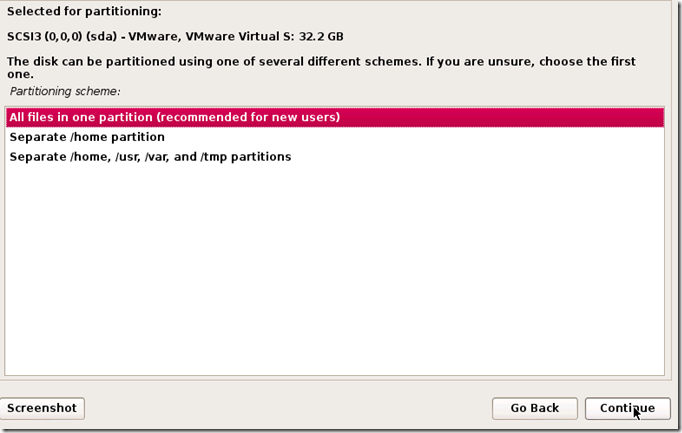
One more question about the partition will appear. Select the option that says All files in one partition and hit Continue.
step 18.9
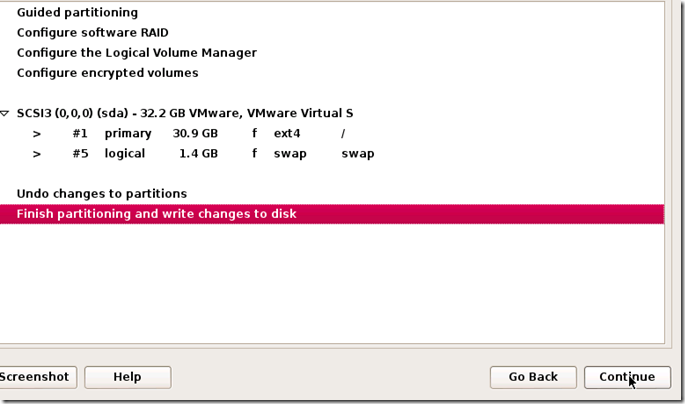
Step 19:
Confirm that you want to make these changes by selecting Finish partitioning and write changes to disk. Then hit Continue.
step 19
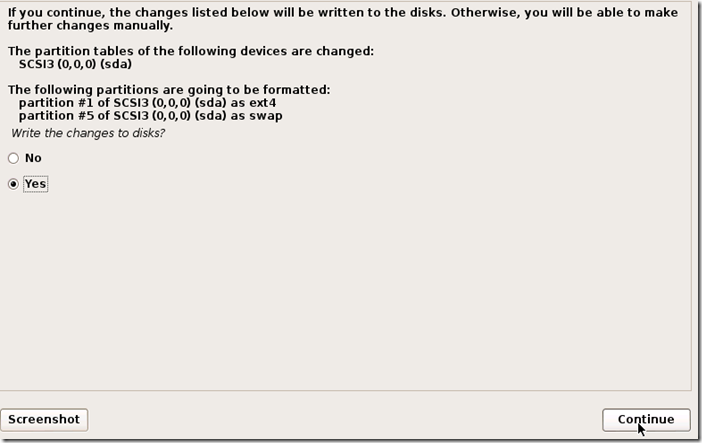
Step 20:
The last question! Confirm that you really want to make these changes by moving the dot toYes and hitting Continue for the last time.
step 20
Kali will now start installing! Wait until it has completed, this might take upwards of 30 minutes.
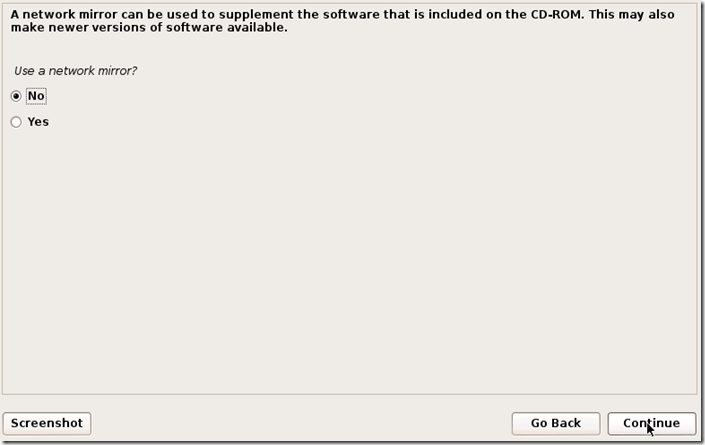
Step 21:
Alright, Kali has finished installing and now you are presented with a window that asks you about a network mirror. You can just select No and hit Continue.
step 21
Step 22:
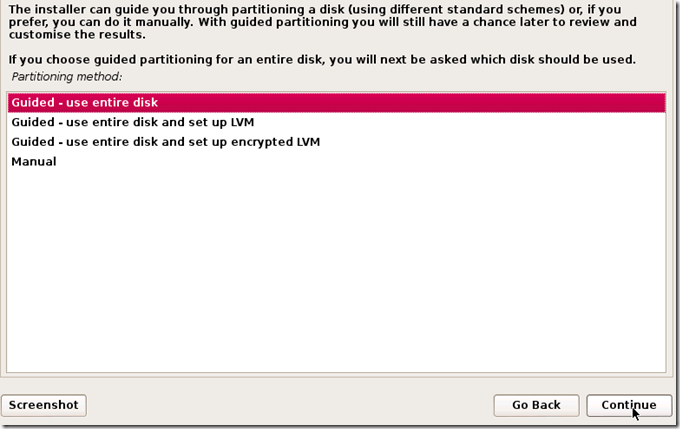
After a few minutes, the installer will ask you if you want to install GRUB boot loader. Click Yesand Continue.
step 22
Step 23:
The installation should now complete, and you’ll be shown with the following notification message:
step 23
Click Continue.
Step 24:

After it restarts, login to it with the user name root and the password that you created earlier.