RN-QQHFzQYtPGkUCfyu8eve2qf0

Thursday, 13 February 2014

Complete Detailed Guide on Installing Kali linux in Vmware

0 comments
This tutorial will walk you through the difficult process of installing Kali Linux in VMware Player, a free virtual machine manager that can be downloaded from www.vmware.com. This tutorial assumes that you have some basic knowledge of your computer (amount of RAM number of processors, etc.) This tutorial is also intended for beginners who haven’t worked with VMware or Kali Linux before.


Step One:

First we need to download Kali from http://kali.org/downloads/. If you have a 64-bit capable computer (like me), then you probably will want the 64-bit version of Kali for performance reasons. Expand the drop down menu’s to find the version you need. Select the 64-bit version ONLY if you have a 64-bit computer.

step 1
Step Two:
If you don’t have a torrent program, then click the link highlighted above and select “Save” when the download notification appears. Make sure you know where you saved it.
step 2
If you have a torrent program, then I highly recommend using the torrent option. Click on theTorrent link, it will open the torrent file in your browser. Just copy the URL of it and enter it in your torrent program.

step 2.1
step 2.2
Now wait for Kali to download, this might take several hours, depending on your internet speed.
Step Three:
When Kali has finished downloading, open VMware Player and click Create a new virtual machine.

step 3
Step Four: 
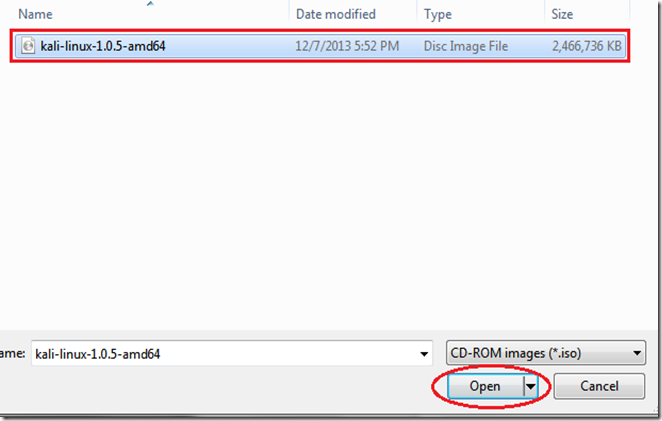
In the window that opens, select Installer disc image file (iso) and browse to the location of and select the Kali Linux ISO file that you just downloaded.
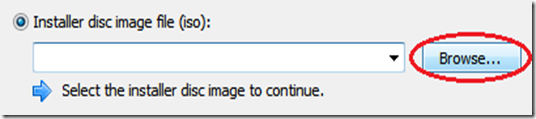
step 4
step 4.1
Once you have selected the file, click Next.
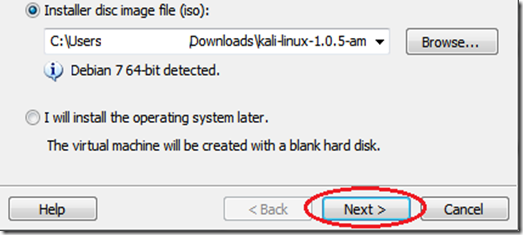
step 4.2
Step Five:
In the next step, select a name for the virtual machine. I’m going to name it Tutorial Kali for this tutorial. You also need to select a location for it, I recommend creating a folder called “Virtual machines” in My Documents. Then click Next.
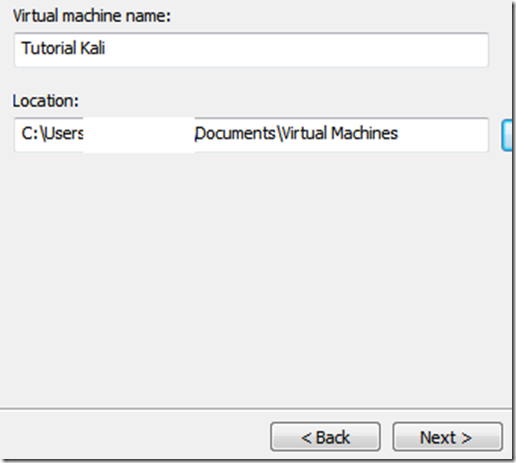
step 5
Step Six:
Next step, you need to select a maximum size for Kali. I recommend doing at least 30 GB’s as Kali tends to expand over time. After you’ve entered your desired value (no less than 20 GB) change the next option to Store virtual disk as a single file and click Next. 
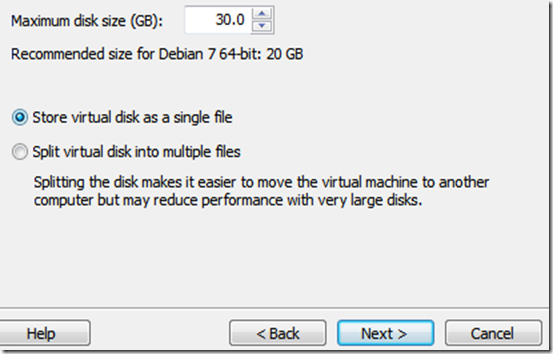
step 6
Step Seven:
In the next window, we need to customize some hardware settings, so click on the Customize Hardware… button.
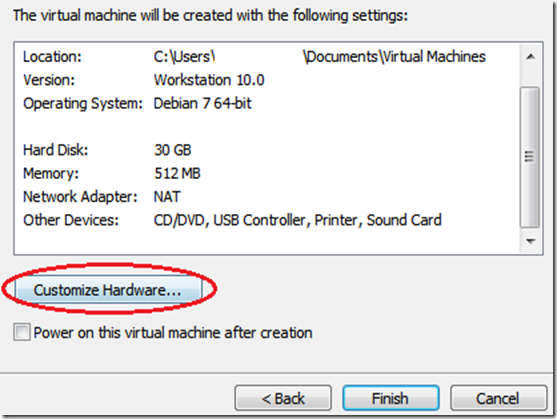
step 7
Step Eight:
You will now be presented with a Hardware window. In the left pane select Memory in the left pane of the window, and slide the slider on the right side to at least 512 MB*. This is for performance. Since I have 8 GB of RAM on my computer, I’m going to put it at 2 GB’s (2000 Mb’s).*Note, you should give a virtual machine a maximum of half the RAM installed on your computer. If your computer has 4 GB of RAM, then the max you want to slide it to is 2 GB. If your computer has 8 GB, then you can go to a max of 4 GB etc.. 
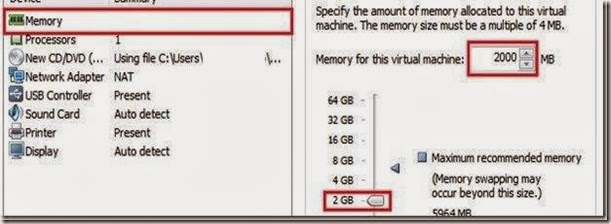
step 8

Now highlight Processors in the left pane. This option really depends on your computer, if you have multiple processors, then you can select two or more. If you have a regular computer, with two or less, then I suggest leaving this number at one.
step 8.1

Moving on, click on Network Adapter in the left pane. On the right side, move the dot to theBridged (top) option. Now click on the Configure Adapters button.
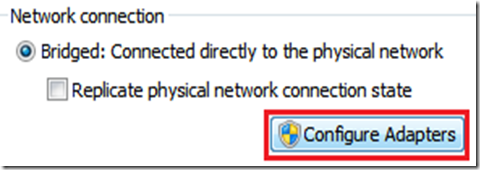
8.2
In the small window that pops up, uncheck all the boxes except for the one next to your regular network adapter and hit OK.
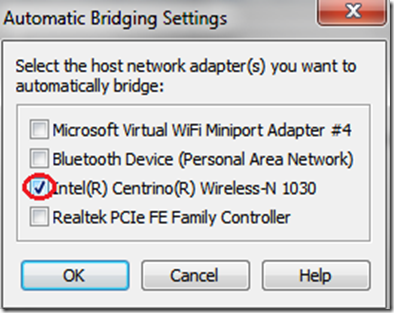
8.4
You can now click on Close at the bottom of the Hardware window and then click on Finishin the Wizard.
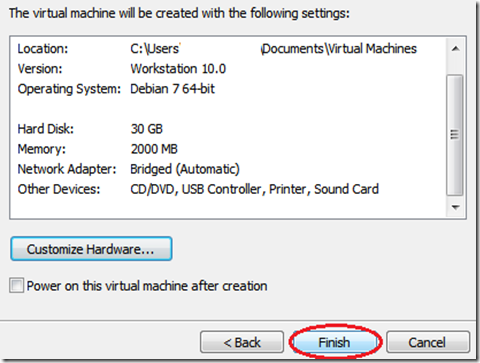
step 8.5

Step Nine: 
After you click Finish the window will close and the new virtual machine file will be added to the VM library. Now all we have to do is start Kali and install it! To do this, highlight the name of the newly created virtual machine by clicking on it, and click Play virtual machine in the right pane.

step 9
This will start Kali for the first time.
Step 10:
At the boot menu, use the arrow keys to scroll down to Graphical install and hit enter.
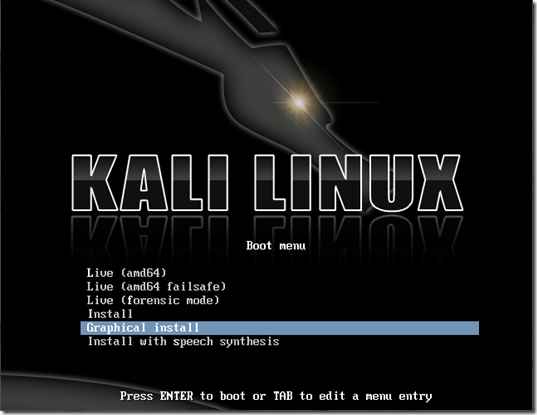
step 10
Step 11:
The next screen will ask you to select your preferred language, you can use the mouse to select this, then click Continue.
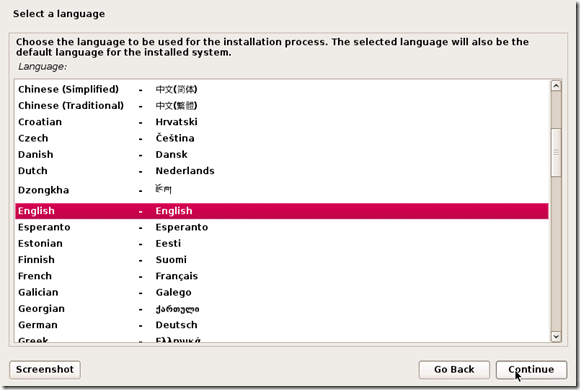
step 11
Step 12: 
On the next screen, select your location and hit Continue.
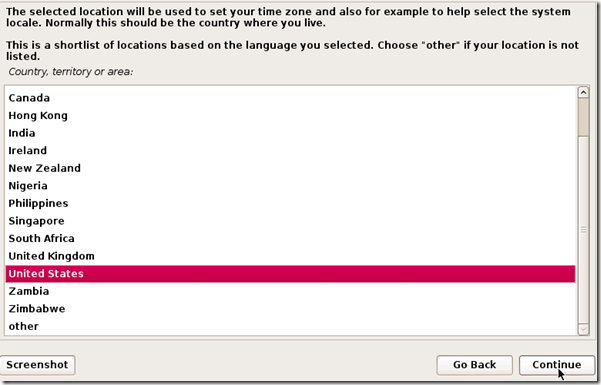
step 12
It’ll now ask you for your standard keymap. If you use the standard American English keyboard, then just click Continue.
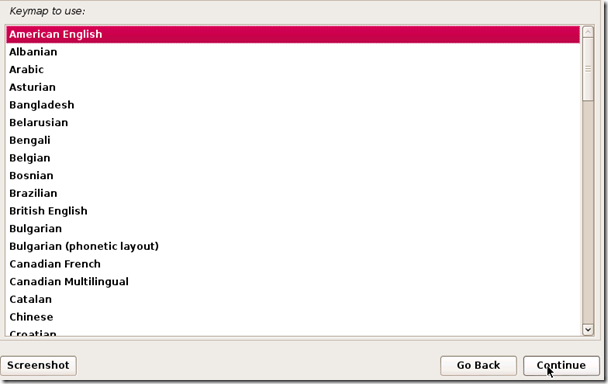
step 13
Step 14:
Wait until Kali finishes detecting the hardware on your computer. During this, you might be presented with this screen:

step 14
Just hit Continue and select Do not configure the network at this time on the next screen.
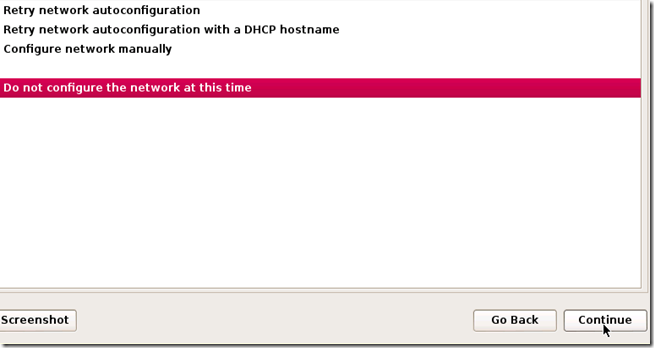
step 14.5
Step 15:
You will now be asked to supply a hostname, which is kind of like a computer name. You can enter anything you want, or you can just leave it as kali. When you’re done, hit Continue.
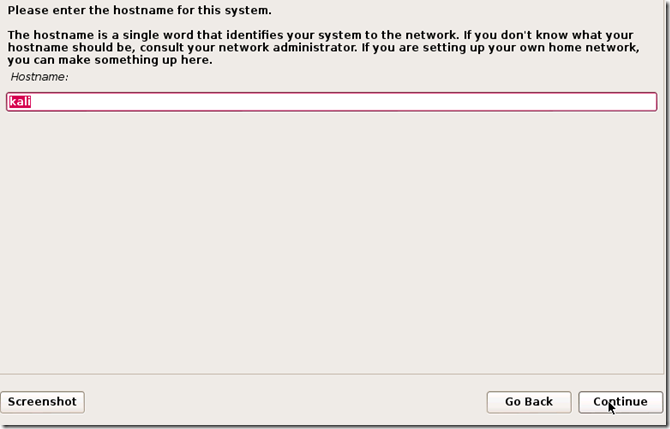
step 15
Step 16:
Kali will now ask you to enter a password for the root (main) account. Make sure you can easily remember this password, if you forget it, you’ll have to reinstall Kali. Hit Continue after you’ve enter and re-entered the password of your choice.
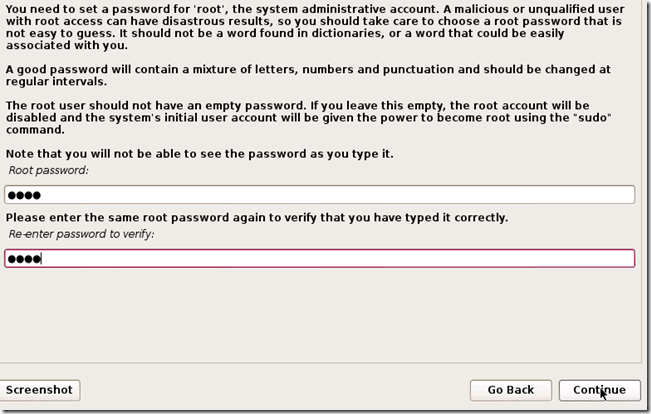
step 16
Step 17:
The next step will ask you for your time zone, select it and click Continue.
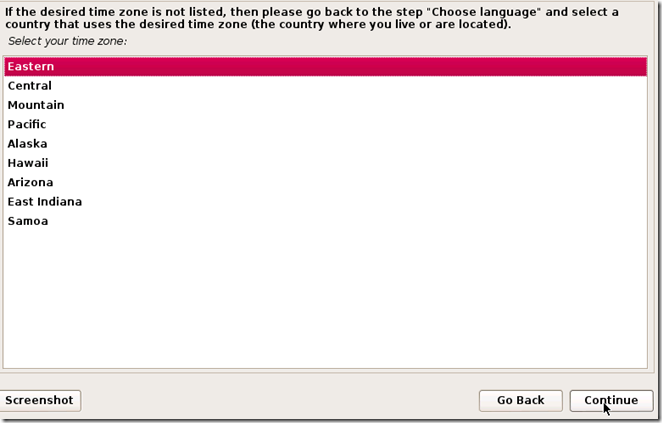
step 17
Step 18:
Wait until Kali detects the disk partitions. When you are presented with the next step, selectGuided – use entire disk. (this is usually the top option) then click Continue.
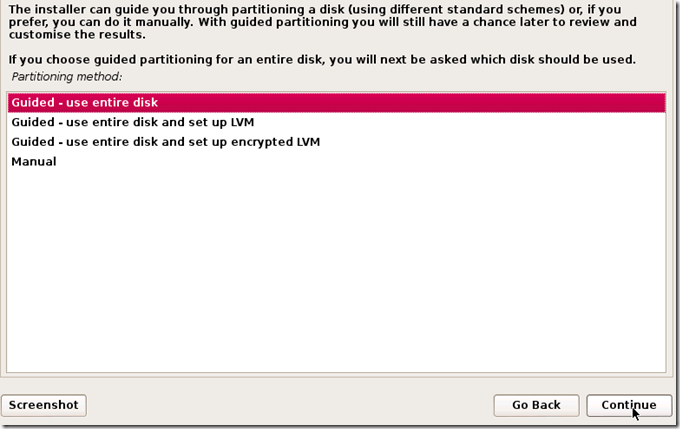
step 18
The installer will now confirm that you want to use this partition. Hit Continue.
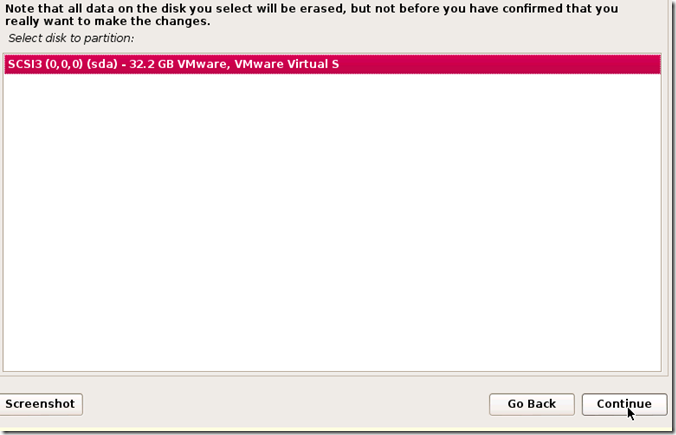
step 18.5
One more question about the partition will appear. Select the option that says All files in one partition and hit Continue.
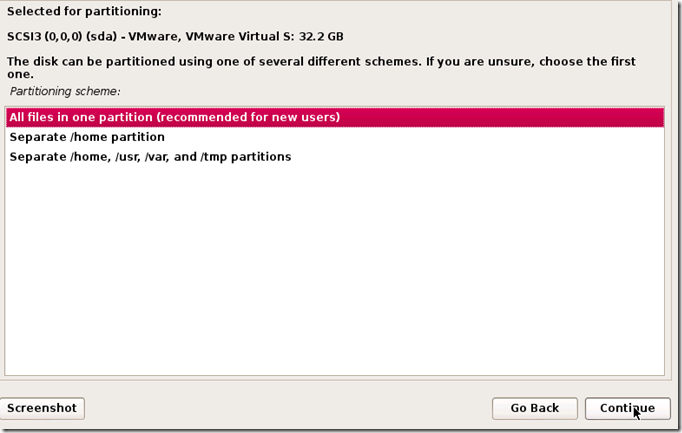
step 18.9
Step 19:
Confirm that you want to make these changes by selecting Finish partitioning and write changes to disk. Then hit Continue.
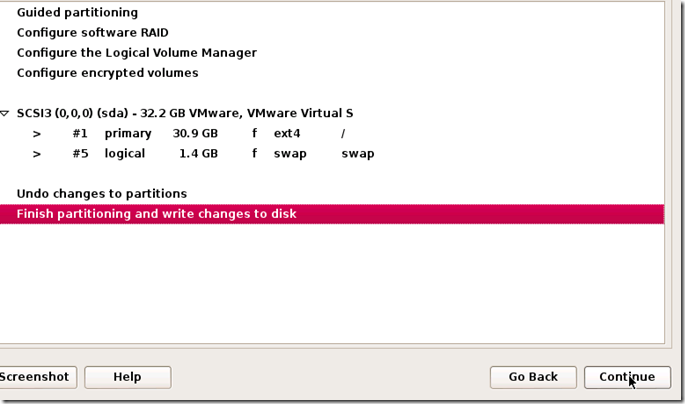
step 19
Step 20:
The last question! Confirm that you really want to make these changes by moving the dot toYes and hitting Continue for the last time.
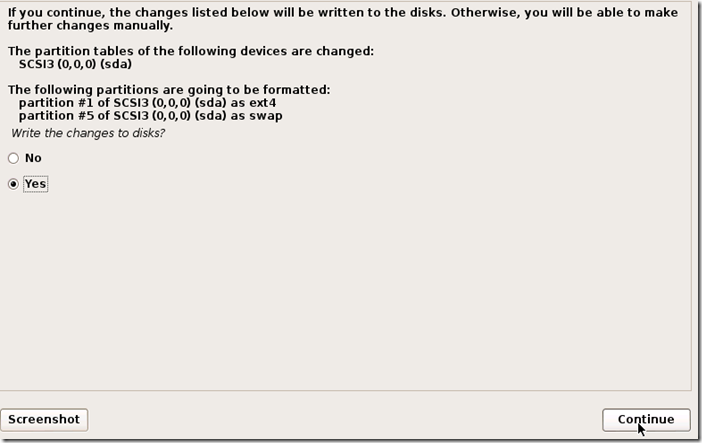
step 20
Kali will now start installing! Wait until it has completed, this might take upwards of 30 minutes.
Step 21:
Alright, Kali has finished installing and now you are presented with a window that asks you about a network mirror. You can just select No and hit Continue.
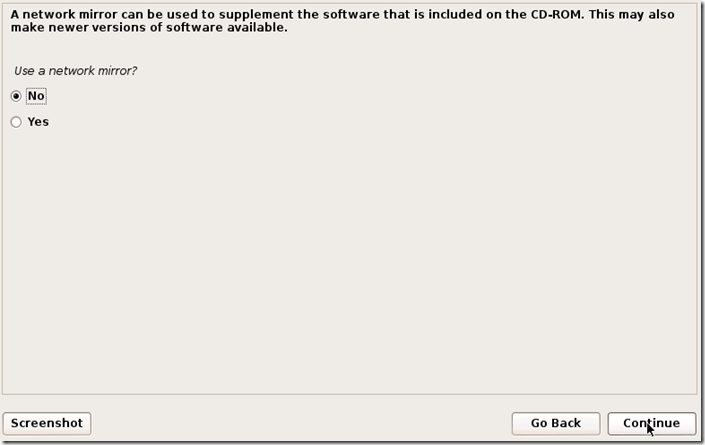
step 21
Step 22:
After a few minutes, the installer will ask you if you want to install GRUB boot loader. Click Yesand Continue.
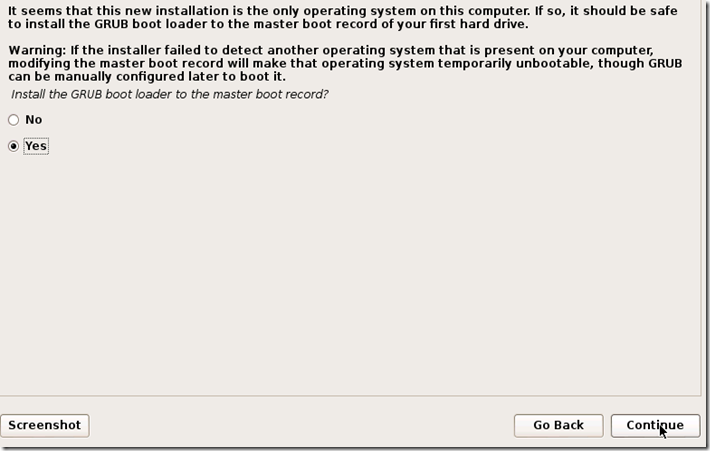
step 22
Step 23:
The installation should now complete, and you’ll be shown with the following notification message:

step 23
Click Continue.
Step 24:

After it restarts, login to it with the user name root and the password that you created earlier. 


Friday, 8 November 2013

Installing Kali - Dual Booting Kali With Windows

0 comments

Kali Linux Dual Boot with Windows

Installing Kali alongside a Windows installation can be quite useful. However, you need to exercise caution during the setup process. First, make sure that you’ve backed up any important data on your Windows installation. Since you’ll be modifying your hard drive, you’ll want to store this backup on external media. Once you’ve completed the backup, we recommend you peruse Kali Linux Hard Disk Install, which explains the normal procedure for a basic Kali install.
In our example, we will be installing Kali Linux alongside an installation of Windows 7, which is currently taking up 100% of the disk space in our computer. We will start by resizing our current Windows partition to occupy less space and then proceed to install Kali Linux in the newly-created empty partition.
Download Kali Linux and either burn the ISO to DVD, or prepare a USB stick with Kali linux Liveas the installation medium. If you do not have a DVD or USB port on your computer, check out the Kali Linux Network Install. Ensure you have:
  • Minimum of 8 GB free disk space on Windows
  • CD-DVD / USB boot support

Preparing for the Installation

  1. Download Kali Linux.
  2. Burn The Kali Linux ISO to DVD or copy Kali Linux Live to USB.
  3. Ensure that your computer is set to boot from CD / USB in your BIOS.

Dual Boot Installation Procedure

  1. To start your installation, boot with your chosen installation medium. You should be greeted with the Kali Boot screen. Select Live, and you should be booted into the Kali Linux default desktop.
  2. Now launch the gparted program. We’ll use gparted to shrink the existing Windows partition to give us enough room to install Kali Linux. 

    dual-boot-kali-01
  3. Select your Windows partition. Depending on your system, it will usually be the second, larger partition. In our example, there are two partitions; the first is the System Recovery partition, and Windows is actually installed in /dev/sda2. Resize your Windows partition and leave enough space (8GB minimum) for the Kali installation. 

    dual-boot-kali-03
  4. Once you have resized your Windows partition, ensure you “Apply All Operations” on the hard disk. Exit gparted and reboot.
    dual-boot-kali-05

Kali Linux Installation Procedure

  1. The installation procedure from this point onwards is similar to a Kali Linux Hard Disk install, until the point of the partitioning, where you need to select “Guided – use the largest continuous free space” that you created earlier with gparted.

    dual-boot-kali-09
  2. Once the installation is done, reboot. You should be greeted with a GRUB boot menu, which will allow you to boot either into Kali or Windows. 
    dual-boot-kali-11

VMWare Tools

0 comments
Once you are done setting Kali Linux with VMWare, there is still stuff that you might want to do.
Note: This article assumes that you have basic knowledge about linux cli and have already installed kali linux. If not, read this article about installing kali linux and getting acquainted to command line interface.

Should you decide to create your own VMware installation of Kali Linux rather than using the  pre-made VMware images available at Kali Linux official site, you will need to follow the instructions below in order to successfully install VMware Tools in your Kali installation. You can opt to install either open-vm-tools, or the native VMWare tools.

Installing open-vm-Tools

This is probably the easiest way to get “VMWare tools” functionality inside a kali VMWare guest.
apt-get install open-vm-tools

This should be sufficient, but if you are feel that this was way too easy, then you are up for an adventure. Without knowledge of cli, what follows might look like a nightmare.

Installing VMware Tools in Kali

If open-vm-tools does not work for you, or if you prefer using native VMWare tools, begin by installing some packages that are required by the VMware Tools installer:
echo cups enabled >> /usr/sbin/update-rc.d
echo vmware-tools enabled >> /usr/sbin/update-rc.d

apt-get install gcc make linux-headers-$(uname -r)
ln -s /usr/src/linux-headers-$(uname -r)/include/generated/uapi/linux/version.h /usr/src/linux-headers-$(uname -r)/include/linux/
Next, mount the Vmware tools ISO by clicking “Install VMware Tools” from the appropriate menu. Once the VMware Tools ISO has been attached to the virtual machine, we mount the drive and copy the VMware Tools installer to /tmp/.
mkdir /mnt/vmware
mount /dev/cdrom /mnt/vmware/
cp -rf /mnt/vmware/VMwareTools* /tmp/
Then, change directory to /tmp/, extract the tarball and start the installer:
cd /tmp/
tar zxpf VMwareTools-*.tar.gz
cd vmware-tools-distrib/
./vmware-tools-install.pl
Follow the prompts for the VMware Tools installation and you are done.
Lastly, to get rid of possible VMWare service errors, edit the /etc/init.d/vmware-tools script, and at around line 876, change:
 # POSIX shell uses '!' for negation during bracket expansion.
   # See http://pubs.opengroup.org/onlinepubs/9699919799/utilities/V3_chap02.html
   IFS=.
   set -- `uname -r`
to :
 # POSIX shell uses '!' for negation during bracket expansion.
   # See http://pubs.opengroup.org/onlinepubs/9699919799/utilities/V3_chap02.html
   IFS=.
   set -- `uname -r|cut -d"-" -f1`
Once changed, proceed to restart the VMWare tool service.

Slow Mouse Movement in VMware

If your mouse movement is slow and sluggish in a Kali Linux VMware guest, try installing the xserver-xorg-input-vmmouse package in the Kali guest.
apt-get install xserver-xorg-input-vmmouse
reboot