RN-QQHFzQYtPGkUCfyu8eve2qf0

Friday, 28 December 2012

Download Glass Skin Pack for Windows 7

2 comments
Hello friends, Today I came with one of the most beautiful tips about Windows 7. Most of you get bored by using the same interface in your Windows 7 PC. So here I'll give you the Glass interface skin pack for Windows 7.
Download Glass Skin Pack for Windows 7

This free Glass interface skin pack will make your Windows more attractive and colorful. After the installation completes you will feel a fresh mind while working with Windows 7. If you're a Windows 7 user, don't wait anymore. Download the free skin pack and transform Windows 7 to Glass GUI. You can download both 32-bit and 64-bit from following links.

Download Glass Skin Pack for Windows 7 32-bit

Note: Before install this skin pack, uninstall if any other skin pack installed.

Monday, 17 December 2012

What You will Lose When You Upgrade Your PC to Windows 8 From Different Windows Versions

0 comments
Nowadays Windows 8 is the hot topic among the operating system. Daily huge amount of the Windows lovers are upgrading their PC to Windows 8 OS. This latest operating system consists many new features like Apps, touch screen supports etc. If you have not still upgrade your PC to Windows 8, click here to know how to upgrade PC to Windows 8. Before that let's have a small look on what you will loss when you upgrade PC to Windows 8 OS.


From windows 7
If you are upgrading your PC from Windows 7, there is no problem. All the personal files, apps and all the Windows settings will automatically get transferred to Windows 8 OS.

From Vista
If you are upgrading your PC from Vista, only Windows Settings and your Personal file will get transfer. And all the installed apps will never get transferred to Windows 8. You have to re-install the particular apps manually.

From XP 
If you are upgrading your PC from Windows XP, you will lose all the Windows settings and Apps. It only transfers the Personal files.

Windows 8 Release Preview
If you are upgrading your PC from Windows 8 Release Preview, it will transfer only your personal files. It will never transfer your windows settings and Apps etc...


Windows Consumer Preview or Windows Developer Preview 
When you transfer your PC to Windows 8 from Windows Consumer Preview or Windows Developer Preview. You will loss everything and you can get back all the personal files manually from Windows old folder.

Here I'll give a screen shot from Microsoft about this,


Saturday, 24 November 2012

Download Free 2012 Christmas Theme Pack for Windows 7

0 comments
2012 Christmas season is gonna start from next month. I hope you guys will enjoy every second of it. So let's start the enjoyment from your PC. Today I'll give you few of the amazing Christmas themes pack for all your Windows 7 PCs. Just get these free themes pack and make your Windows 7 PCs more colourul in this Christmas season.


01. Holiday Lights by Microsoft


This theme pack consist 17 high resolution background images.


02. Twinkle Wish by Microsoft


This theme pack consist 6 high resolution background images.


03. Christmas Themepack by Windows 7 News


This theme pack consist 9 high quality Christmas wallpapers.


04. Windows 7 Christmas Theme by ~blackboy993


This theme pack consist 11 high resolution Christmas wallpaper


Monday, 19 November 2012

Internet Explorer 10 Released for Windows 7 PCs

0 comments
Microsoft has officially released Internet Explorer 10 release preview for Windows 7 PCs. This new arrival comes with some latest features, such as Offline Calculator app. IE 10 release preview is now available for more than 30 languages worldwide. This new version of Internet Explorer 10 release preview doesn't supports with XP, Vista, and old version PCs. And Internet Explorer 10 is the default browser in Microsoft's Windows 8 OS. 


Internet Explorer 10 Released for Windows 7 PCs
Note: 
IE 10 Release Preview is now launched under test mode. Sometimes there is a chance available to get some errors and bugs frequently when you are working with IE 10.

Click here to Download Internet Explorer 10 Release Preview

Monday, 29 October 2012

How to Speed Up Internet with High Speed DNS Server

0 comments
Hey guys, today i came with another internet speedup trick without using any software. Before doing this, complete the following tricks. These tricks have been already posted on my blog. So do these all tricks and get the maximum benefits from it.

First, speedup your internet connection 20%- 30% without using any software. To do this, click the below link.
Speed up Internet Connection 20%- 30% Without Using Any Software

After that do this, it's about how to speed up internet connection using cmd. To do this click the below link.

How to Speedup Internet Connection Using CMD


How to Speed Up Internet with High Speed DNS Server

Finished doing the above mentioned tricks? OK !! then now lets see about today's post. Today we will see how to speedup internet connection by doing some changes in DNS.

We can call DNS as phone book of the web, this gives you all the details of the domain name to your browser. When you are using the default DNS provider from your ISP, it will be a slow access. You can speedup internet connection by using high speed DNS providers.


How to do this?

Go to Control Panel

Then go to Network and Sharing Center

Click on Local Area Connection

How to Speed Up Internet with High Speed DNS Server

Then click on Properties

How to Speed Up Internet with High Speed DNS Server

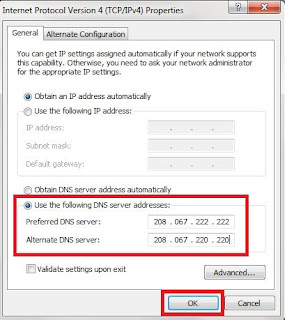
After that, Select Internet Protocol Version 4 (TCP/IPv4) and click on Properties
                                               OR
Double Click on Internet Protocol Version 4 (TCP/IPv4)


How to Speed Up Internet with High Speed DNS Server

Now click on Use the following DNS addresses and change it as follows.

Preferred DNS Server : 208.067.222.222
Alternate DNS Server : 208.067.220.220

                                OR
Preferred DNS Server : 8.8.8.8
Alternate DNS Server : 8.8.4.4


How to Speed Up Internet with High Speed DNS Server

Then Click on OK, That's all. Now your internet connection will speedup with high speed DNS server.

Saturday, 13 October 2012

How to Speed Up Internet Connection Without Any Software

0 comments
Internet takes a prominent place in today’s fast moving world. there are people who are completely addicted to it, but the problem that we all face today in using internet is Speed. internet itself got lots of software to improve its speed, but how many of those actually work perfectly? your reply would be simply "NO"

How to Speed Up Internet Connection Without Any Software

How would you feel if I tell you a way to increase the speed of your internet connection without any software or expenses? There is a simple windows trick available to do this task easily.
Already I have given you a trick to Speed Up Internet 20% - 30% Without Any Software. Don't miss to read it.

How to Speedup Internet Without Any Software?

Right Click on My Computer

Click on Properties

Then click on Device Manager


How to Speed Up Internet Connection Without Any Software


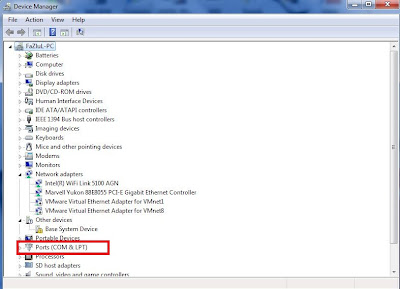
Now Device Manager window will appear

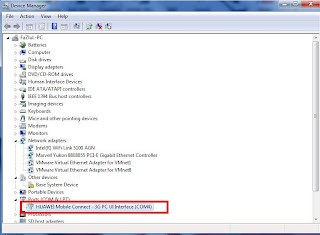
In this, Double Click on PORTS (COM & LPT)


How to Speed Up Internet Connection Without Any Software  


Then, Double Click on Comunications Port


How to Speed Up Internet Connection Without Any Software


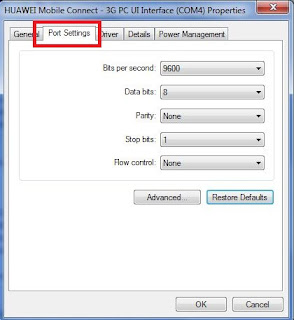
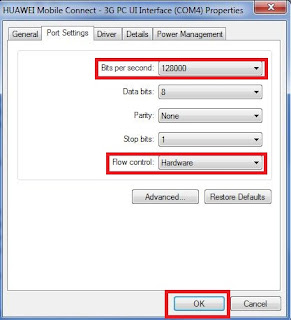
Now select Port Settings tab


How to Speed Up Internet Connection Without Any Software


Change Bits per second value to 128,000
And change the flow control to hardware


How to Speed Up Internet Connection Without Any Software

Now Click on OK

That's all, you have done !!! And when you browse the internet again, definitely you will feel the difference in speed.

Monday, 8 October 2012

How to Burn CD/DVD Without Any Software

0 comments
At the starting CD and DVDs were the best data storage tools for all the PC users. But today technology has improved a lot, we are using pen drives, memory cards or portable storage devices to transfer data between PCs and to store our data.
Due to some situation still we are using CDs and DVDs to transfer data between computers. If you want to write something (data) on a CD/DVD, you need a software called Nero. Today lets look at how to write a CD/DVD without using any software.

How to Burn CD/DVD Without Any Software

For Windows 7 and Windows Vista users.

Insert a writable CD/DVD.

Now open the CD/DVD Drive in My Computer.

After that, just drag and drop all the files which you want to burn.

Now Right Click on your CD/DVD as shown in image below and Click on Burn to disk.


How to Burn CD/DVD Without Any Software
Then Click on Burn, now burning will start automatically.

If you want to give a name to DC/DVD, rename it before burning.


For Windows XP users

Insert a writable CD/DVD into your PC.

Now open the CD/DVD Drive in My Computer.

After that, just drag and drop the all files which you want to burn.

Now click Write these files to CD (this option is placed in your left side).


How to Burn CD/DVD Without Any Software

After that, CD Writing Wizard window will appear.

In this, give a name to CD/DVD and click Next.


How to Burn CD/DVD Without Any Software

That's all, you have done. Now your CD/DVD will burn without any software helps.


Friday, 28 September 2012

How to Format USB Pen Drives Using Command Prompt to Delete Viruses Permanently

0 comments
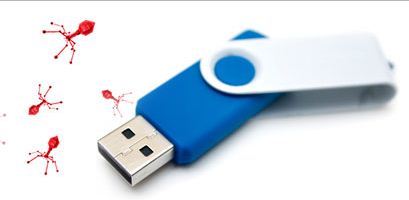
When you're using a pen drive to transfer data between PCs, the common problem is viruses. You might format your pen drive many times because of viruses. Some kind of viruses never get delete by normal formatting. Are you disappointed of the result that you get after formatting your pen drive and still find viruses in it?

Here I'll give you a solution to format your USB pen drive completely.

You can format pen drives using command prompt to remove all the virus files permanently. Most of the times these type of formats delete all the viruses from pen drive.


How to Format USB Pen Drives Using Command Prompt to Delete Viruses Permanently

So let's see how to format your pen drive using command prompt.


Insert pen drive into your PC

Find the drive letter of the pen drive

Now click on Start ---> Run

In run box, type cmd and hit Enter

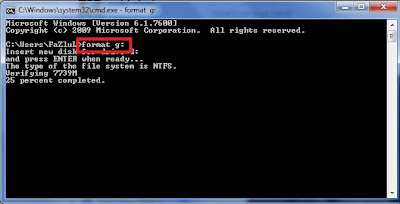
Now command prompt will appear, in this window type format "your pen drive letter:"
For example type : format g:


Hit Enter twice

Wait for sometime until command prompt verify the file system.


How to Format USB Pen Drives Using Command Prompt to Delete Viruses Permanently


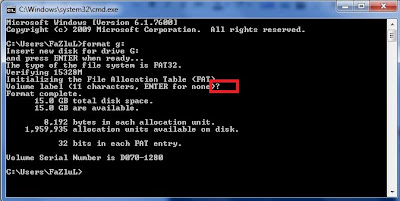
Now command prompt will ask you to enter a drive name.

After that type the drive name and then hit Enter again.


How to Format USB Pen Drives Using Command Prompt to Delete Viruses Permanently


That's all, you have done !!!

Wednesday, 19 September 2012

Top 7 Free Backup Tools for Windows

0 comments
Personal computer is the safest place to secure our important data and files.
We save our most important files and documents in it to secure them without losing. But sometimes we may lose them
 due to hard disk crash, corrupt or virus attack. So we are the right person to keep our important data in a safe and secure place. 

Here I'll give some best free backup tools (for Windows) to protect your most important data without losing. These powerful freewares can protect your data away from corruption.


Top 7 Free Backup Tools for Windows

Best Free Backup Tools for Windows

1. FBackup


2. GFI Backup

3. Comodo Backup


4. ToDo Backup

5. Cobian Backup


6. SyncBack

7. DriveImage XML


Monday, 3 September 2012

How to Hide any Local Drive using Command prompt

0 comments

Today Computer World tutorial is about how to hide a local drive without any 3rd party software. There are lots of free and payable software's available to hide local drive, but I'm not gonna talk about hide a local drive using a software. In this tutorial I'll show you an easiest way to hide local drive without using software. This will save your both money and time.

There are 3 methods available to hide a local drive without using any software

1. Hide a drive through gpedit
2. Hide a drive through regedit
3. Hide a drive using command prompt


Today we are covering command prompt way of doing it. So lets see how to do.


How to Hide any Local Drive using Command prompt

How to Hide a Local Drive using command prompt?

1. Click on Start - Run

2. In Run box type cmd and hit Enter. Now Command Prompt window will appear.

3. In command prompt, type diskpart and hit Enter.

4. Then type list volume and hit Enter.

Now it will display the list of all your computer drives details.


5. Then type the Drive Letter which you want to hide.
If you want to hide volume E, type select volume E and hit Enter.

Now follow mentioned massage will appear to you.
Volume 4 is the selected volume


How to Hide any Local Drive using Command prompt


6. After that, type remove letter E and hit an Enter.

That's all, you have done. Now restart your computer once. When you start your PC again, you want be able to see the
 particular drive in My Computer.


How to get back Hidden Drive again in My Computer.

Do the procedure which i have mentioned in step 1,2,3,4 and 5 again.

Click Start --> Run --> cmd -->

Then type diskpart - list volume - select volume E

After that type assign letter E and hit Enter.

That's all !! You have got back the hidden local drive. Once again restart your PC, now you will be able to see hidden local drive in My Computer.

Note: Your PC doesn't lost any data by doing this trick .

Saturday, 1 September 2012

How to Recover Hidden Files From Virus Infected USB Pendrive without any Software

0 comments
We are using USB pen drives for data transfer between computers. It's very important to keep your data always with you. When you're using pen drives, the biggest problem is Viruses. Mostly pen drives doesn't consist any security measures. So viruses and malwares can attack our pen drive easily. If virus attacks your pen drive, it hides the all the files and creates .exe extension to replace the hidden files.

Normally you can view hidden files by clicking
Folder Options -->
View -->
Show Hidden Files and Folders

But this simple method doesn't work when your pen drive is attacked by harmful viruses.


How to Recover Hidden Files From Virus Infected USB Pendrive without any Software

So here I'll provide you an easiest method to view your infected files from pen drive without using any software.

Insert pen drive into computer and find drive letter of connected USB drive
For Example, E:

Now click on Start --> Run

In Run box, type cmd and hit Enter

Now command prompt will appear, in command prompt type the drive letter of your pen drive and hit Enter.
Example type E:

After that, type attrib -s -h /s /d *.*


How to Recover Hidden Files From Virus Infected USB Pendrive using Command Prompt

Now hit Enter and wait for sometime. That's all, you have done !!! Now you can view all your files in pen drive without any problems.

Thursday, 9 August 2012

Microsoft Released "Fix It" to Fix Windows Errors Automatically

0 comments

Microsoft has released a portable troubleshoot application to fix some common Windows errors and issues. This application fixes all the errors automatically with one click.
You don't need any separate software to solve your Windows errors. You can fix lots of common errors with Fix It such as Aero interface issues, computer power consumption issues and hardware detection issues etc... 


Microsoft Released "Fix It" to Fix Windows Errors Automatically
Run the EXE file after downloading, it will download the complete Fix It tool for your system. After download completes you can start Fix It portable version by clicking "Launch Fix it.exe"

Click Here to Download 
Fix It portable version

Already i have given you XP Quick Fix for Windows XP users and 7 Quick Fix 2.0 for Windows 7 users. 


XP Quick Fix can solve 25 common problems with one click.
Click here to read Solve 25 common problems in Windows XP with one Software,


7 Quick Fix 2.0 can fix 100+ common problems with one click.
Click here to read Fix 100+ Windows 7 Errors and Problems with one Software


Monday, 6 August 2012

Speed up Internet using Command Prompt

0 comments

Today for all the computer user's major problem is slow internet access. We are using many softwares and tricks to speed up our internet connection. But how many of these softwares and tricks makes us satisfy?

So today I'll give you such a nice trick to speed up your internet connection using command prompt. Already i have given you a post about Speedup Internet without any Software. Don't miss to read it.
Click here to read Speed Up Internet 20% - 30% Without any Software


Speed up Internet using Command Prompt
Note :
Check your Internet speed test on www.scanmyspeed.com before start this trick. Then, again you can check the new internet speed and feel the difference of this awesome trick.


How to Speedup Internet connection using Command Prompt

Click on Start
Type cmd in Search program and files box (Run cmd as Administrator)
Now command prompt will appear
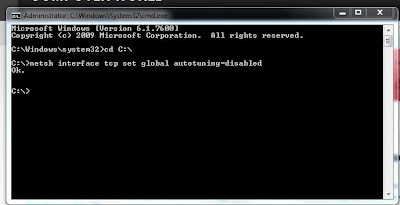
In command prompt go to root directly "C:\" ( type cd C:\ )
Now type netsh interface tcp set global autotuning=disabled


Speed up Internet using Command Prompt

Press Enter. That's all, you have Done !!!

Now check the internet speed on www.scanmyspeed.com and feel the difference. If this article is useful, Put your comments and share with it your friends.


Monday, 30 July 2012

Fix 100+ Windows 7 Errors and Problems with One Software

0 comments

Are you a windows 7 user? If your using windows 7 as your operating system, you must have 7 Quick Fix 2.0 with you.
There is lot of windows repairing and error fixing tools available in the internet but most of them are payable software. 7 Quick Fix 2.0 is freeware click and fix utility that can solve 108 common windows 7 errors with one click.


Solve 108 common problems with one click 7 Quick Fix 2.0


Already i have given you XP quick Fix for Windows XP users which can solve 25 common problem with one click. If your a XP user don't get late to download this valuable freeware.
Click here to read How to Solve 25 Common problems in Windows XP with one Software.

For example if your PC attacked by viruses, mostly Task manager and Registry Editor will get disable. And now you want to enable Task manager or Registry Editor back. If you have 7 Quick Fix, you can easily enable Task manager or Registry Editor with only one click.

Main Features

108 common fixes
7 Quick Fix 2.0 doesn't requere any installation, you can run it from a USB Drive.
Only 1.5 MB
You can fix each problems with onle click
It will show you on screen information for every fix

Click Here to Download 7 Quick Fix 2.0

Tuesday, 17 July 2012

How to Recover Deleted Files without Using Software

0 comments
In this post I'm gonna discuss an easiest Data Recovery Method.
Sometimes we might have delete some important files accidentally and we need them back.
Today I'll show you a trick to recover your deleted files without using any 3rd party software. I'm not talking about restoring files from recycle bin.
This simple trick mostly works on Vista versions and all the Windows 7 versions.
How to Recover Deleted Files without Using Software


So let's see how to recover deleted file without using any software

For example lets assume that you have permanently deleted "My Sweet Heart.JPG" from the folder named "My LIFE" ;) , and now you want to recover "My Sweet Heart.JPG" back.
Do this simple trick to recover your Sweet Heart.JPG
Right Click on the particular folder
Select "Restore previous versions"

How to Recover Deleted Files without Using Software


That's all, now you will see a option to recover the particular file.

How to Recover Deleted Files without Using Software


If you don't see "Restore previous Versions" by Right Clicking, Go to
Control Panel -->
System and Secutiry -->
System -->
Click on System Protection (in left sidebar) -->
Select the particular drive and Click Configure -->
Then select "Restore system setting and previous versions of files" -->
Now Click on OK

Note :
Previous versions come from restore points or from windows backup.
This trick will not work at all the time.


If you haven't get back your deleted files yet,
Use this Powerful Data Recovery Software (Recuva) to recover your deleted files.


Password Protection to USB Drive without using Software

0 comments
Today I'm gonna talk about USB Drives.
I'll show you a simple trick to lock your USB drive without using any 3rd party software.
Most of the people doesn't like other people checking their personal files and folder on USB, including me. This insecure situation creates a huge space to theft our personal data by someone. If you use password protection to your USB, you can reduce the data theft.

Lots of USB password protect software available in present market, but you want to pay money to use it for lifetime. If you're using Windows you don't need any software.


Password Protection to USB Drive without using Software
So let's see how to set a password protect on your USB without using any software.

Insert your USB drive to computer
Click on Start
In "Search programs and files" box, type Bitlocker Drive Encryption
Now launch that application.


Password Protection to USB Drive without using Software

Then look for your USB drive and click on Turn on Bitlocker


Password Protection to USB Drive without using Software

Windows will ask you to set a password.
Now set a strong password.
Click on Next

Password Protection to USB Drive without using Software

If you want save the password in a safe place.
And click on Next


Password Protection to USB Drive without using Software

Now click on Star Encrypting


Password Protection to USB Drive without using Software

That's all !!! :)
From right now if someone tries to access your USB, Windows will ask him/her to enter the current password.

Note : This trick will works only in Windows

Monday, 16 July 2012

Windows 8 Transformation Pack 5.0 Full

0 comments

Microsoft has launched Window 8 recently. But some old computers doesn't contain minimum system requirement to install Windows 8. So today I'm going to give you a Free Windows 8 transformation pack. 

We can transform our Windows 7 , Vista or XP to Windows 8 by using Windows 8 transformation pack. This free transformation pack will change our Windows user interface to Windows 8. 


Windows 8 Transformation Pack latest Full


Windows 8 Transformation Pack 5.0 allows to change the below mentioned things to Windows 8 user interface.

Boot Screen
Login Screen
Task Bar
Themes
Wallpapers
Icon
Sounds
Fonts, Etc .....


Updated : Due to some security season, Windows 8 Transformation Pack 5.0 has been deleted. Windows 8 Transformation Pack more recent version available for download.

Click here to Download Windows 8 Transformation Pack Latest Version

Transform your Windows user interface to Windows 8 & Enjoy !!! :)